By: Team AY1920S1-CS2103T-F12-1 Since: Sept 2019 Licence: MIT
- 1. Introduction
- 2. Setting up
- 3. Design
- 4. Implementation
- 5. Documentation
- 6. Testing
- 7. Dev Ops
- Appendix A: Product Scope
- Appendix B: User Stories
- Appendix C: Use Cases
- Appendix D: Non Functional Requirements
- Appendix E: Glossary
- Appendix F: Product Survey
- Appendix G: Instructions for Manual Testing
1. Introduction
1.1. About the Application
Horo is a command-line interface scheduling application. It helps the user maintain a to-do list and a calendar, and posts timely reminders on their desktop.
1.2. Purpose
This guide specifies the architecture and software design decisions for Horo, and instructions for building upon the current codebase. This is done in hopes of ensuring extensibility and maintainability of Horo for both current and future developers.
2. Setting up
Refer to the guide here.
3. Design
3.1. Architecture
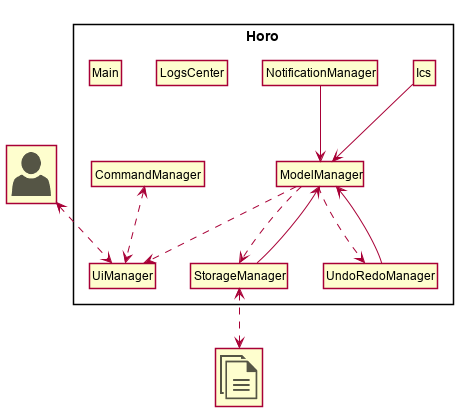
The Architecture Diagram given above explains the high-level design of Horo. Given below is a quick overview of each component.
Main consists of a class called MainApp. It is responsible for:
-
At app launch: Initializes the components in the correct sequence, and connects them up with each other.
-
At shut down: Shuts down the components and invokes cleanup method where necessary.
LogsCenter is used by many classes to write log messages to Horo’s log file.
The rest of Horo is managed by seven components:
-
CommandManager: Responsible for executing commands from the user. -
Ics: Responsible for handling the importing and exporting of ICS files. -
ModelManager: Responsible for reading and writing to the in-memory data of Horo. -
NotificationManager: Responsible for sending notifications to the user. -
StorageManager: Responsible for reading and writing the Model to an external disk. -
UiManager: Responsible for managing the user interface (UI) of Horo. -
UndoRedoManager: Responsible for tracking changes in ModelManager, and reverting its history when needed.
Most components follow the observer design pattern, to reduce tight coupling and increase cohesion. They implement these listeners:
-
CommandInputListener: The component will be notified about command input from the user. -
ModelDataListener: The component will be notified whenever the Model changes. -
UserOutputListener: The component will be notified whenever a message needs to be displayed to the user.
The sections below give more details of each component.
3.2. UI Component
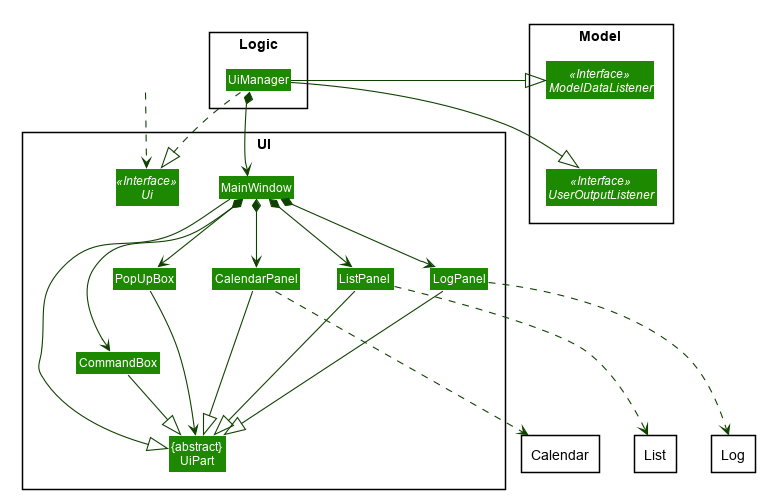
API : UiManager.java
The UI consists of a MainWindow that is contains 3 main view parts - CalendarPanel, ListPanel, LogPanel. It also holds several other UI parts e.g. PopUpPanel and Command Box. Every one of the UI classes will abstract from the abstract UiPart class.
The UI component uses JavaFx UI framework, and layout of these UI parts are defined in .fxml files which are found in the src/main/resources/view folder. One example of the layout would be: MainWindow, whose FXML link is specified in MainWindow.fxml
The UI component does the following:
-
Executes user two different types commands using the
Logiccomponent.-
One command, when executed, affect the actual Events.
-
The other command is executed to change the view of the UI. There are currently 3 main views in the application:
CalendarPanel,ListPanel,LogPanel.
-
-
Listens for any changes in both lists of Tasks and Events using a listener:
ModelDataListener.
3.2.1. Calendar UI View
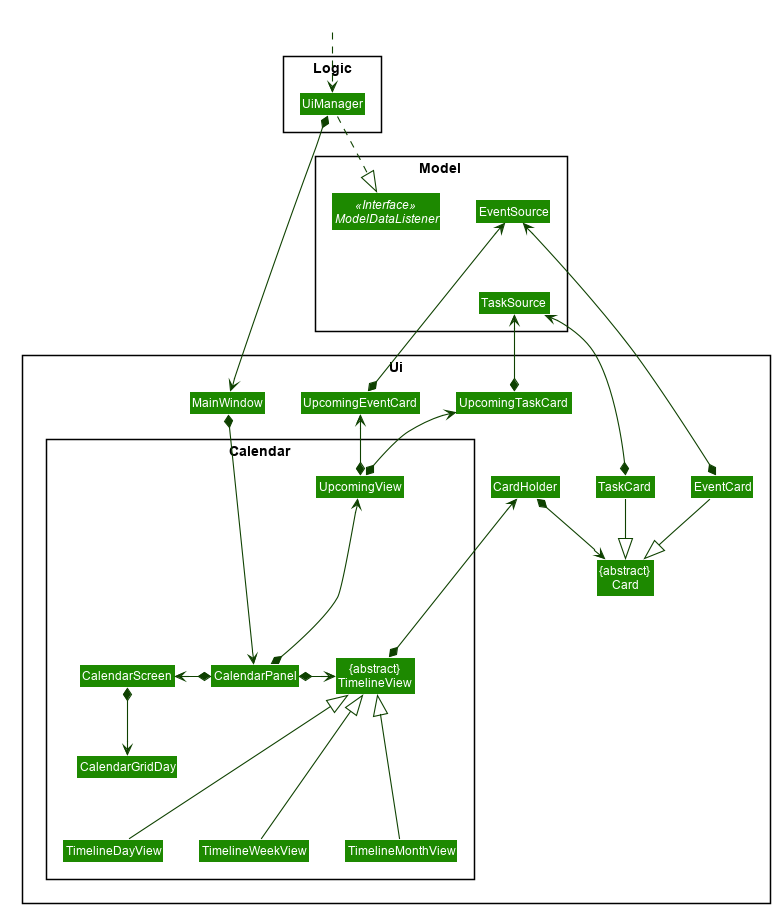
The Calendar View is made up of the CalendarPanel, which holds several different other UI parts linked together to form the overall UI. In the Calendar View, it displays three different UI parts of the Calendar: CalendarScreen, TimelineView and UpcomingView.
CalendarScreen is the screen which displays the calendar of a certain month and year to the user. It contains 6 x 7 instance of CalendarGridDay, which displays the days of the month.
TimelineView is the screen which displays the timeline using 3 different classes which abstract from TimelineView.
-
TimelineDayViewdisplays the timeline of a particular day in a certain month and year. -
TimelineWeekViewdisplays the timeline of a particular week. The week is according to theCalendarScreen, where each row represents a week of a month. -
TimelineMonthViewdisplays the timeline of a particular month in a certain year.
Each of these timeline will hold up to a certain amount of CardHolder depending on the type of TimelineView. Each of these CardHolder will then hold an amount of Card for displaying the event name and date. The details of Card will be explained in the one of the next few sections.
UpcomingView represents a miniature list of Events and Tasks that has a start date or due date in the same month as the user’s system current month, but not before the date as the user’s date. This list will then hold up to a certain amount of UpcomingEventCard and UpcomingTaskCard which will be explained together with Card as well.
3.2.2. List UI View
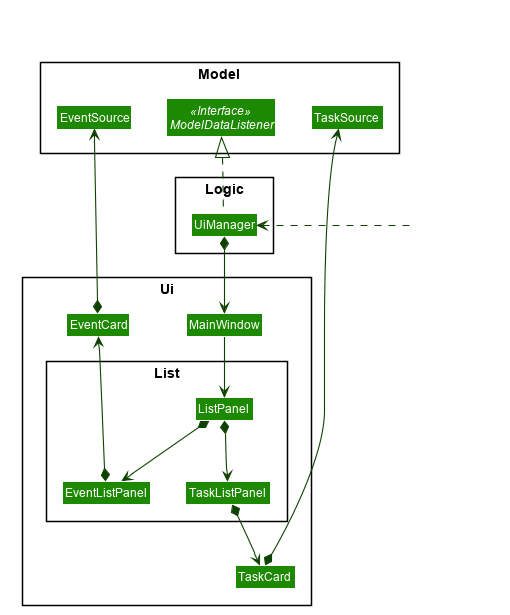
The List View is made up of the ListPanel which contains two lists views, EventListView and TaskListView
-
EventListViewdisplays the list of Events containing every piece of information of the Events. -
TaskListViewdisplays the list of Task, containing every piece of information of each Task.
Similar to TimelineView, EventListView and TaskListView will contain a list of Card to display the information.
3.2.3. Log UI View
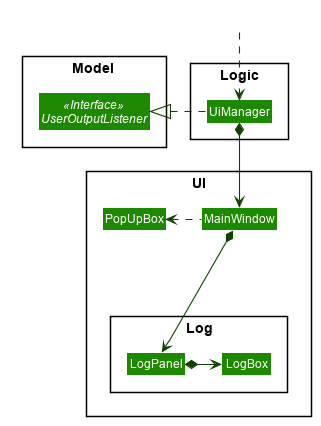
The Log View is made up of the LogPanel which contains the list of LogBox.
LogBox displays literal information back to the user when it is called by MainWindow when it listens for a command.
PopUpBox is rather similar to LogBox. It holds up to the same amount of information, as much until the size of the application window, and collapses the rest. It represents the pop up that animates and displays for a few seconds to the user about the given command.
3.2.4. Card UI
Firstly, there are two types of ways to display information to the user regarding a Event or Task.
-
For Events, it is
EventCard, which is abstracted from theCardabstract class, followed byUpcomingEventCard -
For Tasks, it is
TaskCard, which is abstracted from theCardabstract class, followed byUpcomingTaskCard.
An EventCard may display the following information:
-
Event Description
-
Event Start Date
-
Event End Date (Optional)
-
Event Reminder Date (Optional)
-
Event Tags (Optional)
-
Event Index (For deleting or editing)
An TaskCard may display the following information:
-
Task Description
-
Task Due Date (Optional)
-
Task Reminder Date (Optional)
-
Task Tags (Optional)
-
Task Index (For deleting or editing)
As for UpcomingEventCard and UpcomingTaskCard, they only hold the Description of the Event or Task.
3.3. CommandManager Component
The CommandManager class manages the addition and invoking of Commands in Horo.

Referring to the diagram above, it performs the following operations:
-
Listen for user input in
onCommandInput(). -
Pass the user input to
commandParser, to obtain aCommand. -
Execute the
Commandand obtain aUserOutput. -
Notify all
userOutputListenersabout theUserOutput.
To give a more concrete example of how CommandManager functions, refer to the sequence diagram below of adding a task to Horo:
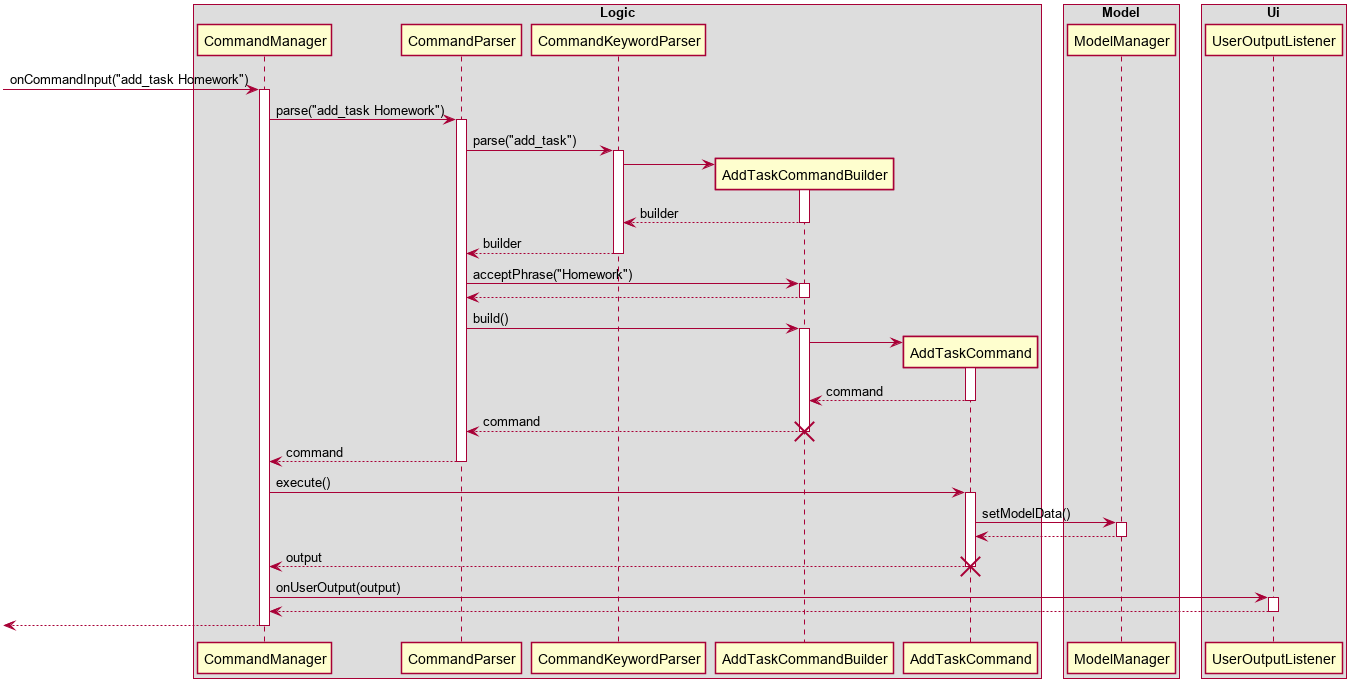
|
CommandManager closely follows the command design pattern. |
3.3.1. Command
A Command is defined to be an immutable function, that can be invoked at any time, to perform any set of instructions.
After executing the set of instructions, it will optionally return output to be displayed to the user.
In Horo, a Command implemented as an abstract class with an abstract execute() method.
To create a new concrete command, extend from Command and implement execute().
If your concrete command requires any dependencies during execution, it is recommended to pass in the dependency from the constructor.
For example, if your command needs to be able to access ModelManager:
public class MyCommand extends Command {
    private final ModelManager model;
    MyCommand(ModelManager model) {
        this.model = model;
    }

    @Override
    UserOutput execute() {
        this.model.doSomething();
        // ...
    }
}
3.3.2. CommandParser
A CommandParser is defined to be able to parse a String of user input, and return a Command.
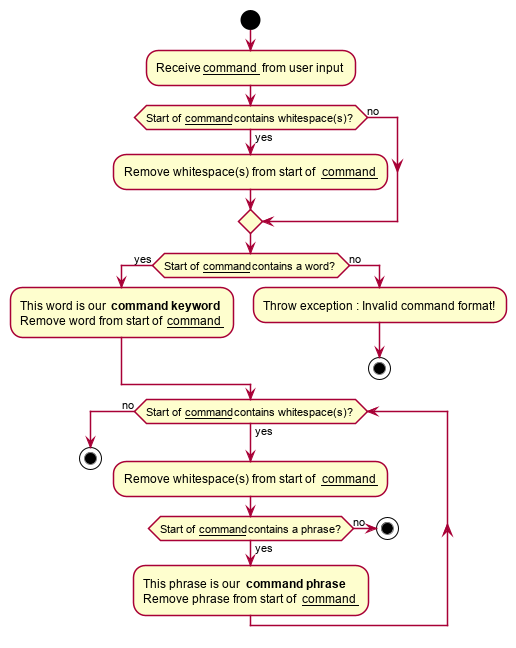
In Horo, a CommandParser is implemented as a finite state machine (FSM). It parses user input token by token, and it transitions from state to state depending on the next token.
What the FSM is trying to do is tokenize user input into:
-
Command keyword -
Command phrase(s)
A command keyword is defined as the first sequence of consecutive, non-whitespace characters of the user input.
For the rest of this guide, a sequence of consecutive, non-whitespace characters will be referred to as a ‘word’.
A word can be described in the form of a regular expression (regex) as [^\s]+.
Examples of valid command keywords:
-
exit -
add_event -
123 -
😺
A command phrase is defined as either a word, or multiple words delimited by whitespace surrounded by quotes. Command phrases come after a command keyword.
Examples of valid command phrases:
-
Horse -
”Homework” -
”Horo’s Birthday” -
”24/10/2019 07:00” -
’24/10/2019 07:00’ -
--description
CommandParser is trying to tokenize any command input into one command keyword, and zero or more command phrases.
(i.e. [keyword] [phrase] [phrase] [phrase] …).
To understand how the FSM works, study the activity diagram below:
After tokenizing, the command keyword is sent to a CommandKeywordParser, which returns a CommandBuilder.
The remaining command phrases are sent to the CommandBuilder, which builds the Command we want.
Design Considerations
| Option 1 | Option 2 | |
|---|---|---|
What |
Use |
Implement a FSM to break up command input into tokens. |
Difficulty |
Easy |
Moderate |
How |
Split the command input by whitespaces, into words. The first word will be the command keyword. All subsequent words will have to be joined into command phrases. |
Create a |
Evaluation |
I did not choose this option because: Joining words into command phrases can become quite complex, especially when introducing quotation marks. Additionally, it is difficult for future developers to maintain and extend logic like this. |
I chose this option because: A state machine is easy to understand and configure. A state machine can tokenize complex command inputs, allowing future developers to parse advanced command inputs. |
3.3.3. CommandKeywordParser
A CommandKeywordParser is defined to be able to parse a command keyword, and return a CommandBuilder.
In Horo, a CommandKeywordParser uses a HashMap to map a command keyword to a Supplier<CommandBuilder>.
3.3.4. CommandBuilder
A CommandBuilder is defined to be able to accept an arbitrary amount of command phrases, and eventually create a Command using those phrases.
In Horo, a CommandBuilder is implemented such that the entire definition of a Command is in the CommandBuilder.
The CommandBuilder will use those definitions to automagically parse command phrases.
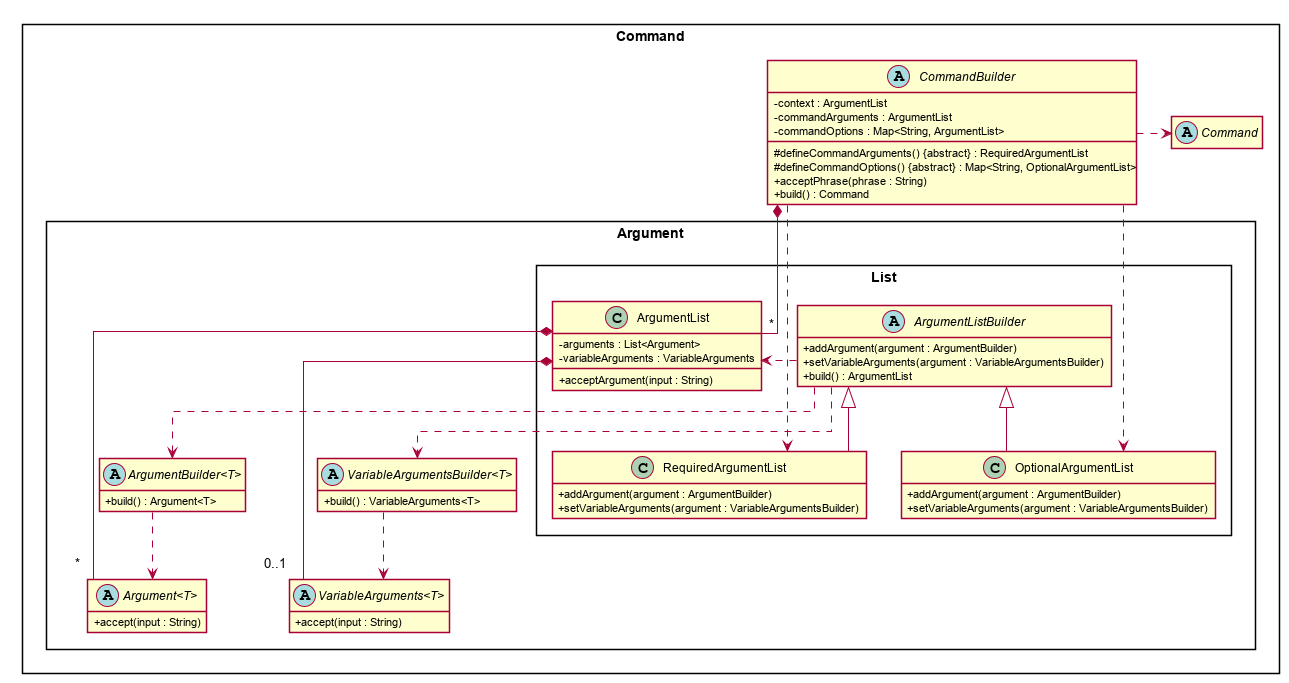
Referring to the diagram above, the definition the command is implemented in two methods:
-
defineCommandArguments() -
defineCommandOptions()
A command option is defined to have a keyword and a list of arguments. An option’s keyword is defined to be a command phrase. An option’s argument is defined to be a command phrase that is not an option’s keyword, and lies after it.
Example of option’s keyword & arguments below. The option’s keyword is underlined:
-
--description Horse -
--tags Animal Cat Dog -
-d Horse
A command argument is defined to be a command phrase that is not an option’s keyword. This is similar to an option’s argument, except that the position of this argument in the user input is important. A command argument is a command phrase that lies after the command keyword, and before any command option’s keywords.
Example of command’s arguments below. The command’s keyword is underlined.
-
add_event Horse “24/10/2019 10:00” -
delete_event 1 2 3
To understand how CommandBuilder works, study the activity diagram below:
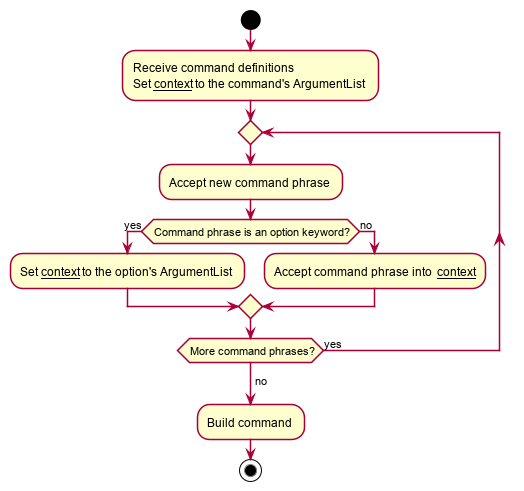
The CommandBuilder API provides a simple way for developers to create a Command.
For example, to create a MyCommand which takes in one String argument, and have an option which also takes in one String argument, you could do this:
class MyCommandBuilder extends CommandBuilder {

    private String arg1;
    private String arg2;

    @Override
    protected RequiredArgumentList defineCommandArguments() {
        return ArgumentList.required()
            .addArgument(StringArgument.newBuilder("Argument 1", s -> this.arg1 = s));
    }

    @Override
    protected Map<String, OptionalArgumentList> defineCommandOptions() {
        return Map.of(
            "--option", ArgumentList.optional()
                .addArgument(StringArgument.newBuilder("Argument 2", s -> this.arg2 = s))
        );
    }

    @Override
    protected Command commandBuild() {
        return new MyCommand(this.arg1, this.arg2);
    }
}
class MyCommand extends Command {
private final String arg1;
private final String arg2;
public MyCommand(String arg1, String arg2) {
this.arg1 = arg1;
this.arg2 = arg2;
}
@Override
public UserOutput execute() {
// Do something with arg1 and arg2
}
}Simply register MyCommandBuilder to CommandManager to use your new command:
commandManager.addCommand("mycommand", MyCommandBuilder::new)|
CommandBuilder closely follows the builder design pattern. |
Design Considerations
| Option 1 | Option 2 | |
|---|---|---|
What |
Each |
Each |
Difficulty |
Easy |
Moderate |
How |
Implement a utility class which can parse user input into arguments. Use this class in each command parser. |
Implement |
Evaluation |
I did not choose this option because: Each command parser will need to implement logic to use the utility class, handle argument checking and parsing errors. It is difficult for future developers to create, extend and test |
I chose this option because: Each Since all logic is in |
3.3.5. Argument
A command’s argument and an option’s argument are both considered an Argument. An argument will be parsed from a command phrase to another object. The Argument class is a generic class, where the type of the class defines what type of object the command phrase be parsed into.
For example, an Argument<DateTime> which receives “24/10/2019 10:00” will be parsed into a DateTime object.
3.3.6. Variable Argument
A VariableArgument is a special type of argument. A variable argument will be parsed from a list of command phrases to a list of similar type objects. The VariableArgument class is a generic class, where the type of the class defines what types of objects the command phrases should be parsed into. A variable argument can accept zero or more command phrases to be parsed.
For example, a VariableArgument<Integer> which receives {1, 2, 3} will be parsed into a list of Integers. A VariableArgument<Integer> which receives {} will be parsed into an empty list.
3.3.7. ArgumentList
A command is said to contain a list of arguments, and it’s options are said to contain a list of arguments too. Both are considered an ArgumentList. An ArgumentList is defined to contain zero or more Arguments, and zero or one VariableArguments.
Additionally, if a variable argument is defined, it will be treated as the last argument in the ArgumentList. This is because a variable argument can accept zero or more command phrases, which will prevent other arguments from receiving command phrases if it is not the last argument.
3.4. ModelManager Component
The ModelManager is responsible for the reading and writing of events and tasks in Horo.
The ModelManager has three main functions:
-
Stores all events and tasks in a wrapper class
ModelData. -
Notifies all
ModelDataListenerswhenever theModelDatachanges. -
Allows any class with a reference to
ModelManagerto update the currentModelData.
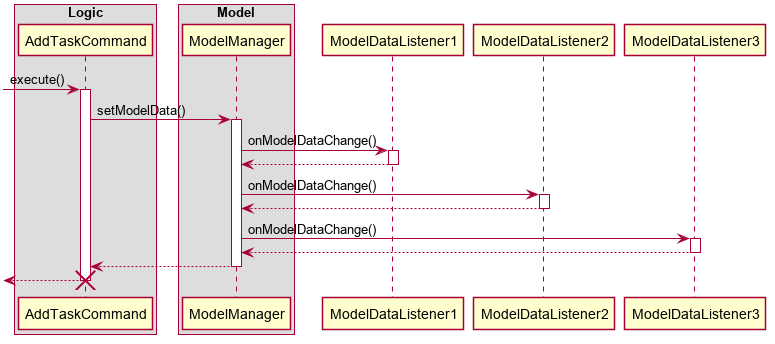
To give a more concrete example of how ModelManager notifies its listeners, refer to the sequence diagram below of adding a task to Horo:
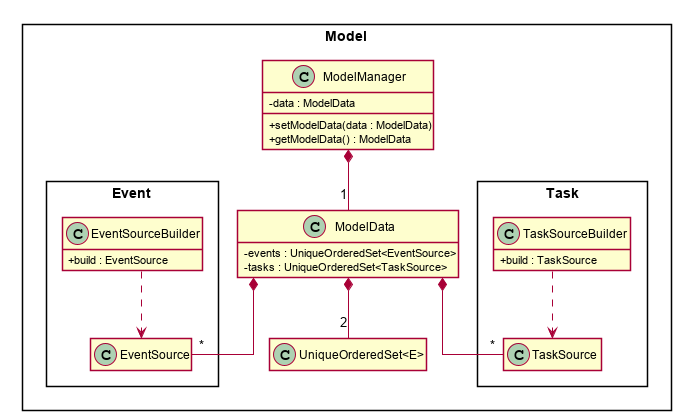
3.4.1. ModelData
ModelData is designed to be a wrapper class which contains a snapshot of Horo’s events and tasks.
It is immutable, and automatically creates deep copies of all events and tasks, to prevent any rouge modifications.
3.4.2. EventSource
An EventSource is a representation of an event in Horo.
It is immutable. It has two required fields, and three optional fields:
Required:
-
Description : Long description of the event
-
Start
DateTime: The beginning of the event
Optional:
-
End
DateTime: The end of the event, if the event has no end it is considered to be an instant in the timeline. -
Reminder
DateTime: When a reminder should be given to the user, used in the [notification system]. -
Tag(s) : User defined tags, which help in organizing the user’s events.
The EventSourceBuilder API provides a simple way for developers to create an EventSource.
For example, to create an EventSource with three tags:
EventSource e = EventSource.newBuilder("CS2103T Lecture", DateTime.now())
    .setTags(List.of("CS2103T", "NUS", "Lecture"))
    .build();
3.4.3. TaskSource
A TaskSource is a representation of a task in Horo.
It is immutable. It has one required field, and three optional fields:
Required:
-
Description : Long description of the task
Optional:
-
Due
DateTime: When the task should be due. -
Reminder
DateTime: When a reminder should be given to the user, used in the [notification system]. -
Tag(s) : User defined tags, which help in organizing the user’s tasks.
The TaskSourceBuilder API provides a simple way for developers to create a TaskSource.
For example, to create a TaskSource with two tags:
TaskSource t = TaskSource.newBuilder("Buy Groceries")
    .setTags(List.of("Shopping", "Groceries"))
    .build();
3.4.4. DateTime
A DateTime is a representation of an instant of time, without timezone information.
It is stored as the number of seconds from epoch. It is immutable.
The DateTimeBuilder API provides a simple way for developers to create a DateTime.
For example, to create a DateTime representing 1st November 2019, 12:00PM (UTC):
DateTime d = DateTime.newBuilder(1, 11, 2019, 12, 0, ZoneOffset.UTC)
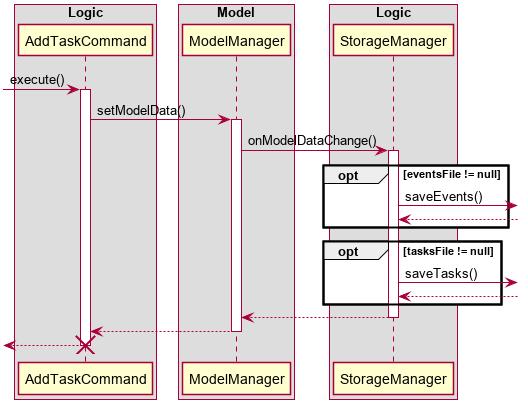
.build();3.5. StorageManager Component
The StorageManager is responsible for the saving and loading of Horo’s Model to the external disk.
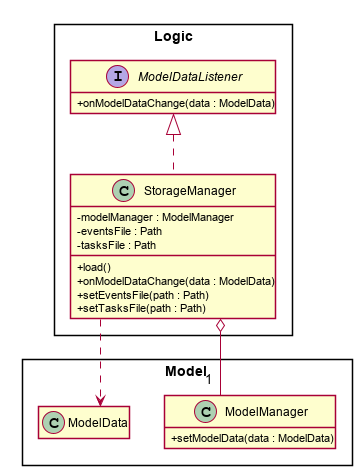
The StorageManager has four main functions:
-
Load the model on Horo startup.
-
Save the model whenever the model changes (notified via
ModelDataListener). -
Serialize the model into Javascript Object Notation (JSON) before saving.
-
Deserialize the model from JSON before passing it to
ModelManager.
For serialization and deserialization of the model, our team has decided to use the well known Jackson library.
EventSource, TaskSource and their respective builders, have appropriate annotations to facilitate serialization and deserialization of JSON.
To give a more concrete example of how StorageManager saves the model, refer to the sequence diagram below of adding a task to Horo:
4. Implementation
This section describes some noteworthy details on how certain features are implemented.
4.1. Undo/Redo feature
4.1.1. Implementation Details
The undo/redo mechanism is facilitated by UndoRedoManager, which contains undoStateList - a history of ModelData states.
Each ModelData object contains two lists: one to store EventSources and the other to store TaskSources,
together representing the state of all event and task data at that point in time. UndoRedoManager also contains a undoIndex,
which keeps track of the index of the ModelData being used presently, as well as a ModelManager object.
ModelManager contains a ModelData object. Horo’s StorageManager, UiManager and UndoRedoManager components
implement the ModelDataListener interface which listens for any changes to this ModelData so that they can be updated accordingly.
Every time a state-changing command (that is not undo or redo) is executed, the a new ModelData representing the modified version
will replace the old one and this new version will then be deep-copied and added to undoStateList.
Should there be a need to revert back to a past or future state (if undo or redo is called), ModelManager#modelData will retrieve their data from the
appropriate copy of ModelData in the list of duplicates.
UndoRedoManager also implements the following operations:
-
UndoRedoManager#undo()— RestoreModelManager#modelDatato their previous versions from the appropriate duplicate inundoStateList -
UndoRedoManager#redo()— RestoreModelManager#modelDatato their future versions from the appropriate duplicate inundoStateList -
UndoRedoManager#clearFutureHistory()-- Delete allModelDatastates that occur inundoStateListafter the index given by theundoIndex
The UndoCommand and RedoCommand will interact directly with UndoRedoManager while other state-changing commands
(such as adding or deleting tasks) will interact only with ModelManager.
The ModelDataListener interface helps us achieve the desired undo-redo functionality:
This listener interface contains a single method, onModelDataChange(ModelData modelData).
The UndoRedoManager implements the ModelDataListener interface’s method onModelDataChange(ModelData modelData) to “listen” for any changes to
ModelManager#modelData (e.g. when an event or task is added or deleted)
If such a change exists, it will be handled by first instantiating a model data with a deep-copied version of the
taskList and the modified eventList, calling UndoRedoManager#clearFutureHistory(), and finally to committing the state to undoStateList
On the other hand, whenever an undo or redo is executed, ModelManager’s `ModelData is updated
to match the data of the model data with index undoIndex in undoStateList so that the correct version of model data is being reflected in the GUI.
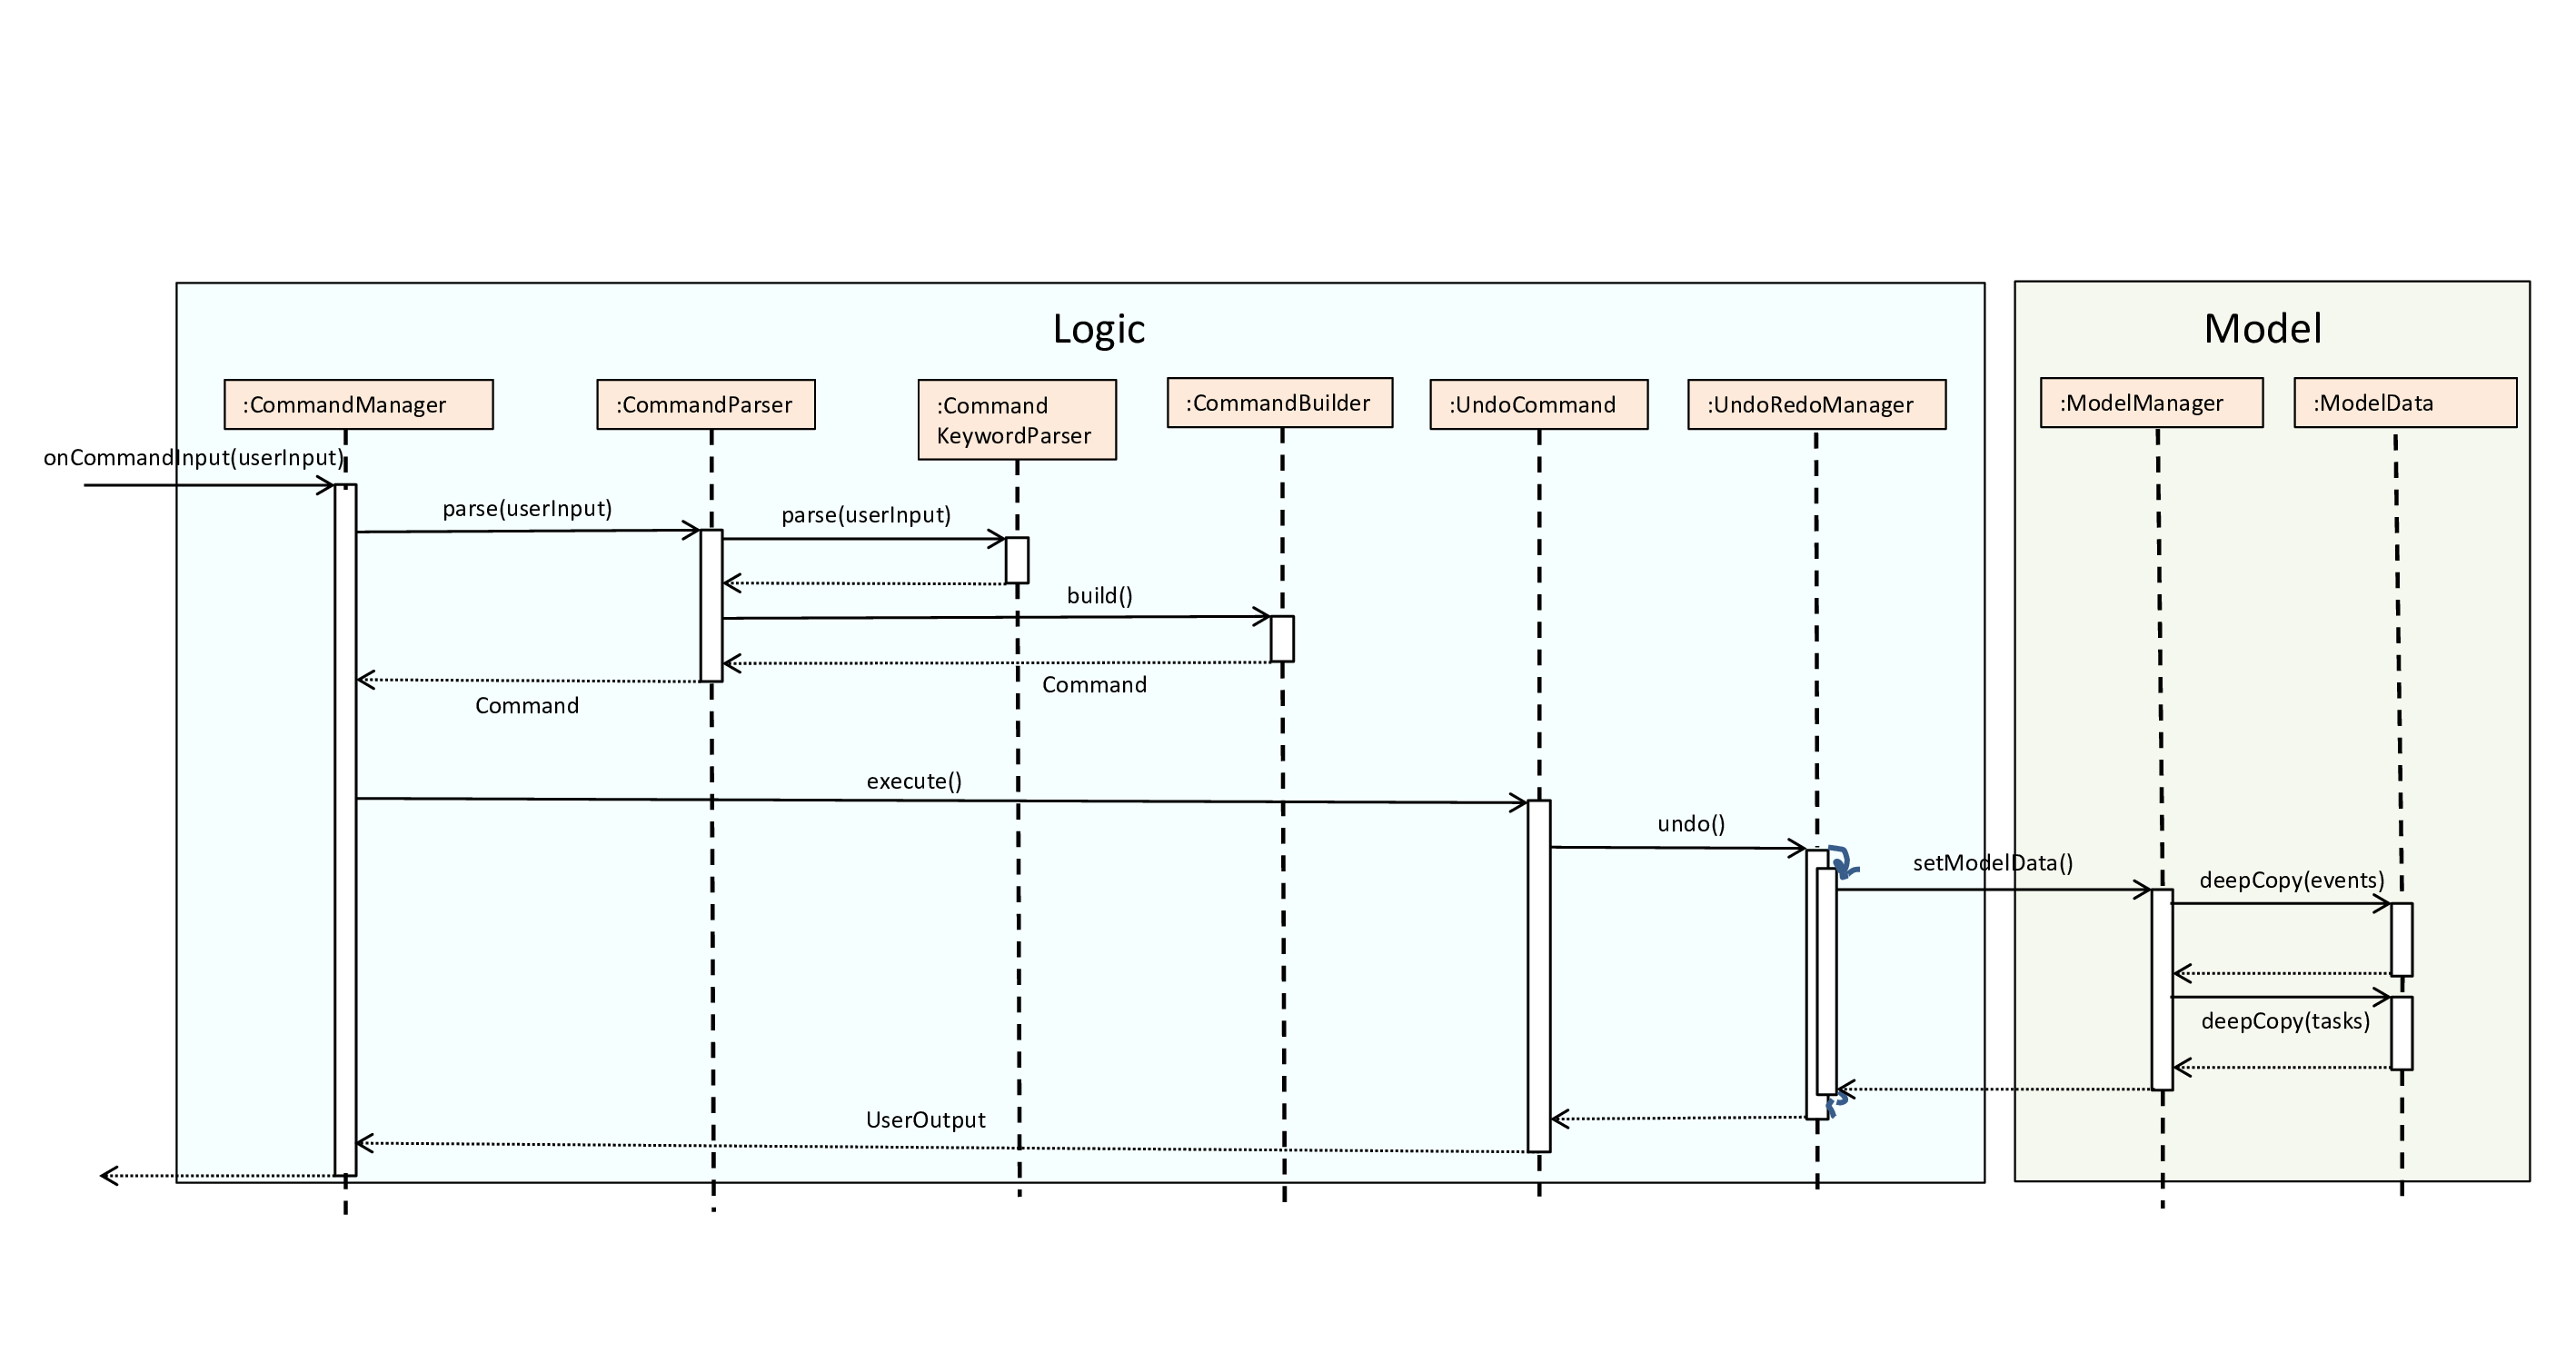
Given below is an example usage scenario and how the undo/redo mechanism behaves at each step.
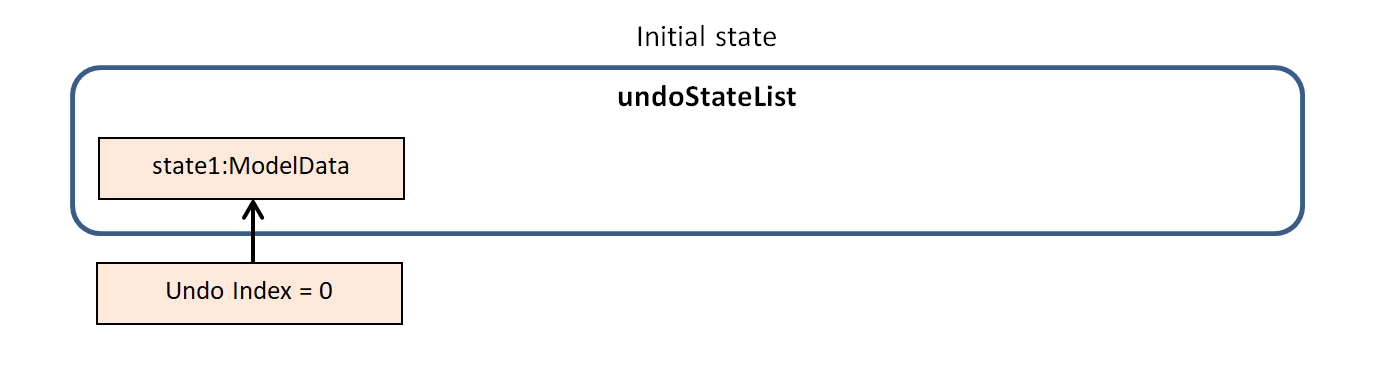
Step 1. The user runs the program for the first time. The UndoRedoManager will be initialized with the initial undoStateList.
A ModelData object will be added to undoStateList and the undoIndex will point to that single model data in the list.
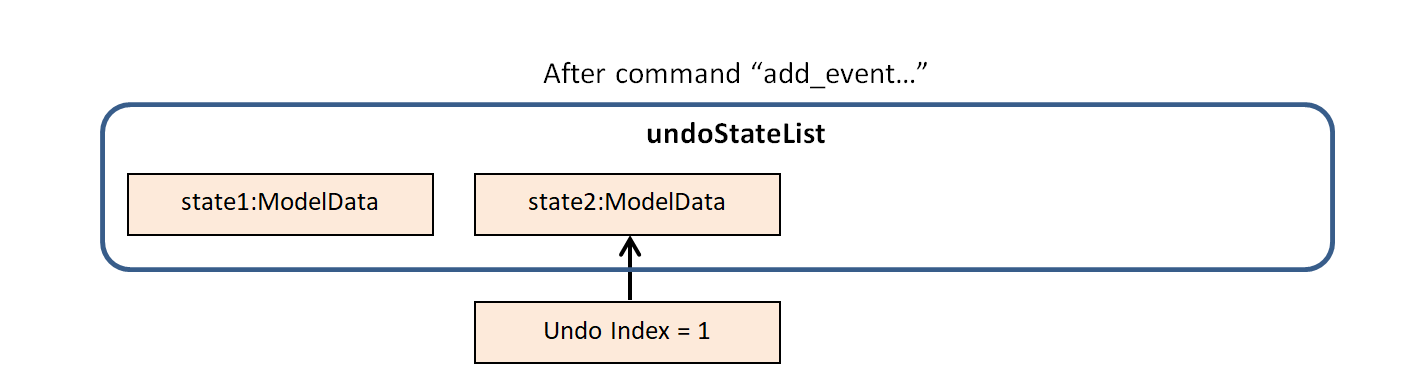
Step 2. The user executes add_event “Suntec City Computer Fair” --at “17/11/2019 12:00”.
ModelManager#ModelData will be reset to a new ModelData object with the added event.
Then, UndoRedoManager#onModelDataChange(ModelData modelData) will be called (as there has been a change to the eventList),
deep-copying the modified ModelData.
All future states beyond the undoIndex will be cleared as they are no longer useful. In this particular case, there are no future states to be cleared.
Finally, the deep-copy of the new model data state will be committed; added to undoStateList.
The undoIndex is incremented by one to contain the index of the newly inserted model data state.
If a command fails its execution, it will not result in any change to ModelManager#ModelData.
Hence, there is no change to trigger the listener methods and thus no ModelData will be saved to undoStateList.
|
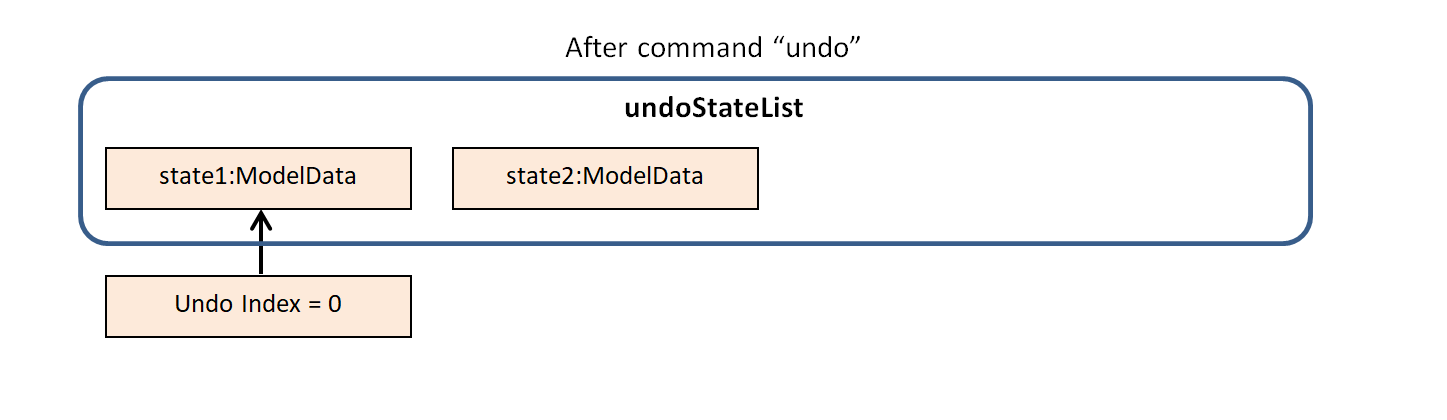
Step 3. Suppose the user decides that adding the task was a mistake. He/she then executes the undo command to rectify the error.
The undo command will decrement the undoIndex by one to contain the index of the previous undo redo state, thereafter triggering the
UndoRedoManager#notifyModelResetListeners method. This method updates ModelManager#modelData to match the data of the
model data with index undoIndex in undoStateList.
If the undoIndex is 0, pointing to the initial model data state, then there are no previous model data states to restore.
The undo command uses UndoRedoManager#canUndo() to check if this is the case.
If so, it will return an error to the user rather than attempting to perform the undo.
|
The following sequence diagram shows how the undo operation works:
The redo command does the opposite — it calls UndoRedoManager#redo(), which increments the undoIndex by one to contain the index of the previously undone state.
The UndoRedoManager#notifyModelResetListeners then causes ModelManager#modelData to be reset to this state’s data.
If the undoIndex is at index undoStateList.size() - 1, pointing to the latest model data state, then there are no undone model data states to restore.
The redo command uses UndoRedoManager#canRedo() to check if this is the case. If so, it will return an error to the user rather than attempting to perform the redo.
|
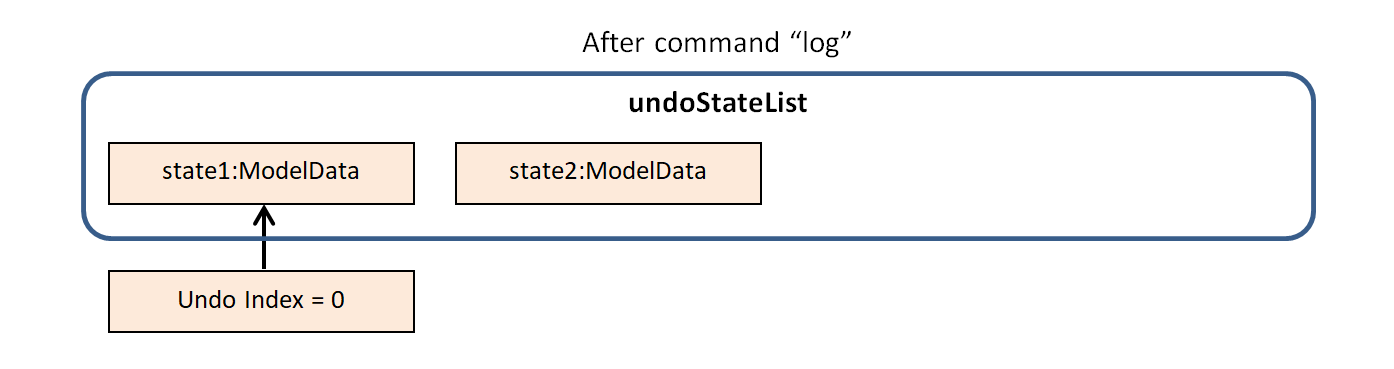
Step 4. The user decides to execute the command log. Non-state-changing commands such as log do not manipulate task and event data.
Since no changes to ModelManager#modelData have been made, the listener methods will not be triggered and no model data will be saved to undoStateList.
Thus, the undoStateList remains unchanged.
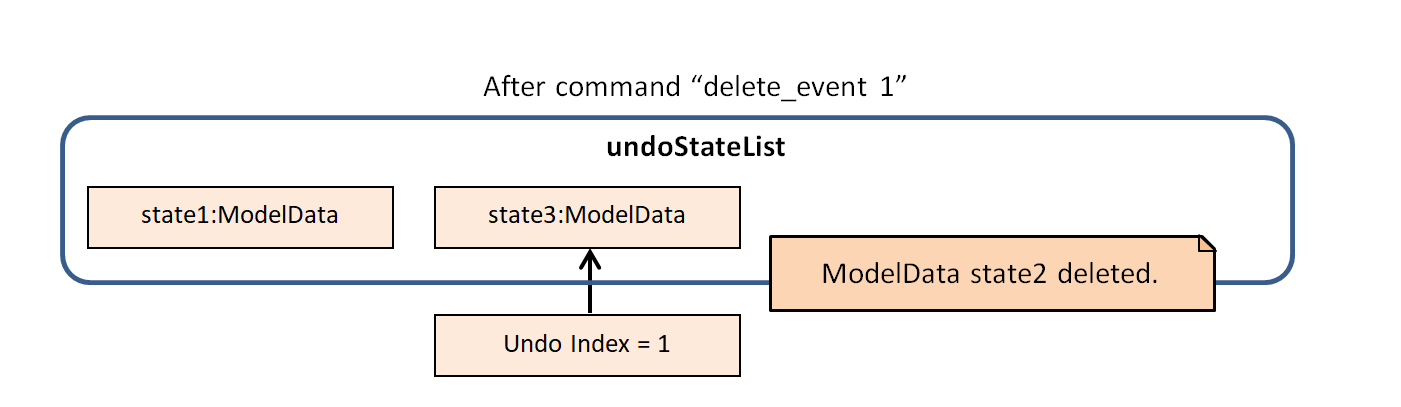
Step 5. The user executes delete_event 1, removing the event from the eventList in ModelManager#modelData.
UndoRedoManager#onModelDataChange(ModelData modelData) will be called (as there has been a change to the ModelData),
purging all future states beyond the undoIndex as they are no longer useful.
The modified model data will be deep-copied and a new model data containing the deep-copies will also be added to undoStateList.
The undoIndex is incremented by one to contain the index of the newly inserted model data state.
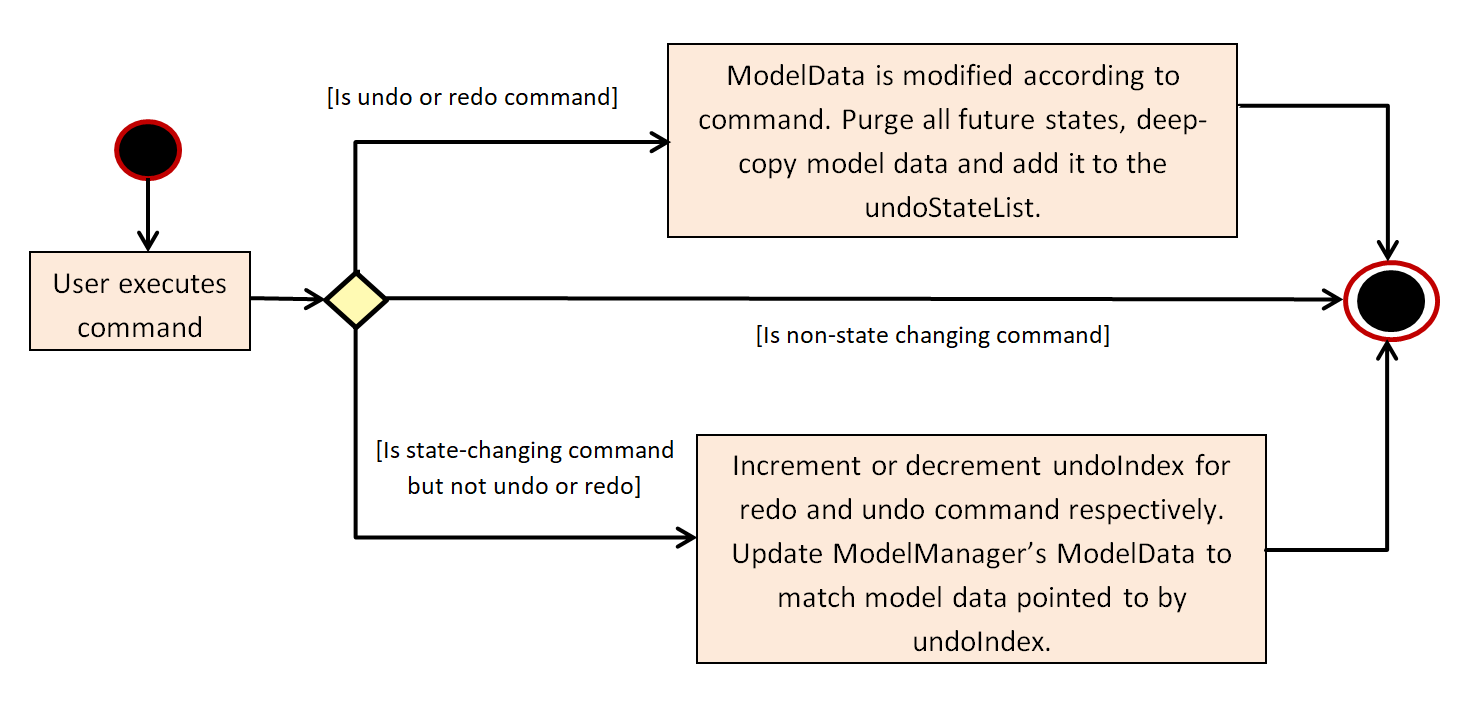
The following activity diagram summarizes what happens when a user executes a new command:
4.1.2. Design Considerations
| Approach 1 (current choice) | Approach 2 | |
|---|---|---|
Pros |
Easy to understand and implement. |
Uses less memory as we only need to keep track of what commands have been executed and their parameters, as opposed to storing all task and event data between every change. |
Cons |
Performance issues may arise due to the relatively larger memory usage required. |
Every command will have to be implemented twice, since their inverse operations will all be different. This is compounded by the fact that we have to ensure the correctness of every inverse operation individually as well. |
4.2. Notification System
4.2.1. Class Architecture
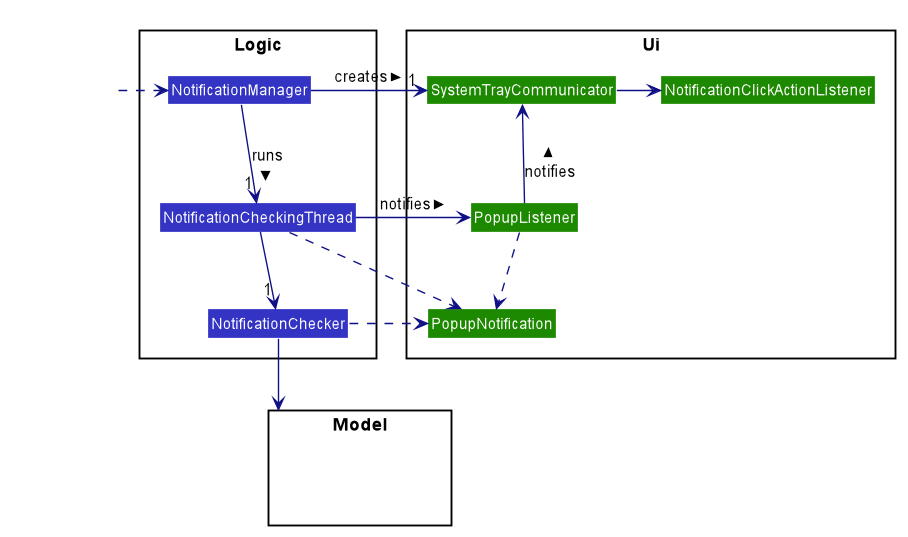
The Notification System is facilitated by the NotificationManager, which is found in the Logic component. Other constituent classes of the Notification System can be found in the Logic and UI components, depending on their functionality. These classes and their functionalities are listed below:
Logic Classes
Logic classes are responsible for deciding if a notification should be posted. As with other components, their functionality is accessed through the NotificationManager class. The NotificationManager class maintains a reference to a NotificationCheckingThread as well as a SystemTrayCommunicator.
The logic classes of the Notification System can be found under the notification package under the Logic component.
-
The
NotificationCheckingThreadis a daemon thread that runs in parallel with the main application. It checks for new notifications to post every minute. -
The
NotificationCheckeris responsible for checkingModelfor any notifications that need to be posted.
UI Classes
UI classes are responsible for displaying notifications to the user.
The UI classes of the Notification System can be found under the systemtray package under the ui component.
-
The
PopupListenerclass is the main channel of communication between the logic and UI classes. When a notification needs to be posted, it will relay the information from the logic to UI classes. -
The
SystemTrayCommunicatorhandles posting notifications and displaying the app’s icon on the System Tray. It listens to theNotificationCheckingThreadthrough aPopupListener. -
The
PopupNotificationclass carries the information that will be posted to a popup notification. -
The
NotificationClickActionListeneris called when the user clicks on a popup notification.
4.2.2. Class Behaviour
As with other Manager classes, an instance of the NotificationManager is created upon the starting of MainApp. The NotificationManager proceeds to initialize and run a NotificationCheckingThread, as well as a SystemTrayCommunicator. Upon being started, the NotificationCheckingThread will enter a notificationCheckingLoop by calling its method of the same name.
To give a better explanation of how the NotificationCheckingThread works, a single run of its loop is illustrated below:
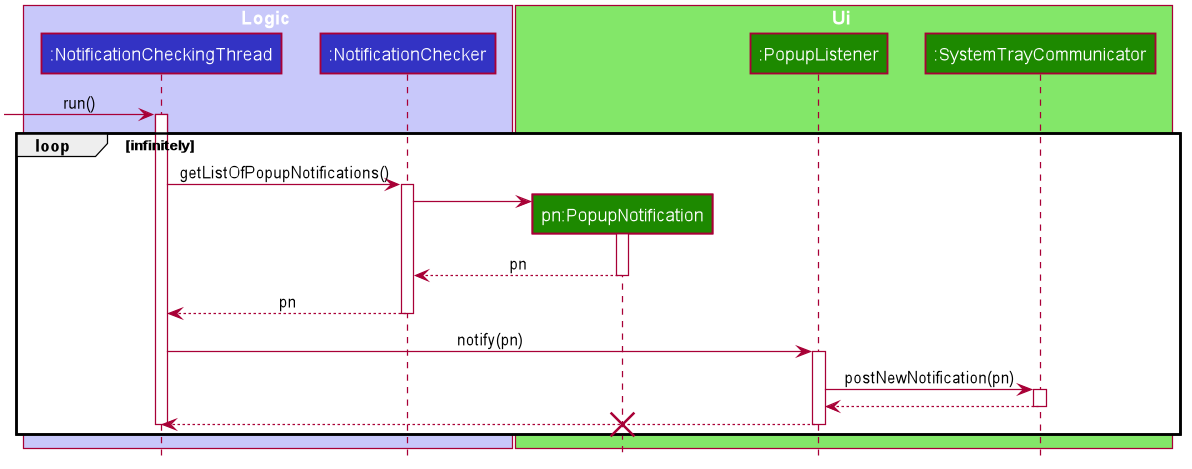
Step 1. The NotificationCheckingThread calls the NotificationChecker to generate instances of PopupNotification through a call to NotificationChecker#getListOfPopupNotifications()
Step 2. For each PopupNotification generated by the NotificationChecker, a call to PopupListener#notify() is made.
Step 3. This prompts the SystemTrayCommunicator to post a new notification.
Step 4. The NotificationCheckingThread sleeps until the start of the next minute, found by the method NotificationCheckingThread#findMillisecondsToNextMinute().
4.2.3. Design Considerations
Aspect: How the Notification system should run
-
Alternative 1 (current choice): Running the Notification system as a separate thread in the same application
-
Pros: Easier to implement and test.
-
Cons: The user would have to leave the application on if they always wanted to be notified.
-
-
Alternative 2: Running the Notification system as a background application
-
Pros: This would allow notifications to be posted to the user’s desktop even if the Horo main app were not open.
-
Cons: This would require the creation of a separate application that the user would have to install on their computer. Because different Java applications are ran in different instances of Java Virtual Machines, this could vastly complicate implementation as the Notification System and the rest Horo would be unable to interact directly.
-
Alternative 1 was eventually chosen as it was simpler to implement and test, and remain within the initial scope of Horo’s development. The application can be potentially changed to use Alternative 2 in the future.
4.3. Logging
We are using java.util.logging package for logging. The LogsCenter class is used to manage the logging levels and logging destinations.
-
The logging level can be controlled using the
logLevelsetting in the configuration file (See [Implementation-Configuration]) -
The
Loggerfor a class can be obtained usingLogsCenter.getLogger(Class)which will log messages according to the specified logging level -
Currently log messages are output through:
Consoleand to a.logfile.
Logging Levels
-
SEVERE: Critical problem detected which may possibly cause the termination of the application -
WARNING: Can continue, but with caution -
INFO: Information showing the noteworthy actions by the App -
FINE: Details that is not usually noteworthy but may be useful in debugging e.g. print the actual list instead of just its size
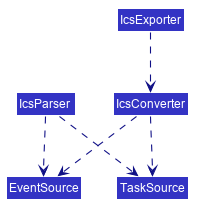
4.4. Ics Component
API : IcsParser.java
The ICS component is made up of 2 main sub-components: ICS file parser, and ICS file exporter.
The file parser makes use of a custom parser that converts files with the .ics file extension
to EventSource and TaskSource objects in Horo.
Here is an overview of how the ICS component looks like:
Right now, this is how the IcsExporter class exports Horo’s EventSource and TaskSource data.
Notice that the file is created onnly when it is known that the directory provided by the user is valid.
This is to prevent extra uncaught errors being thrown.
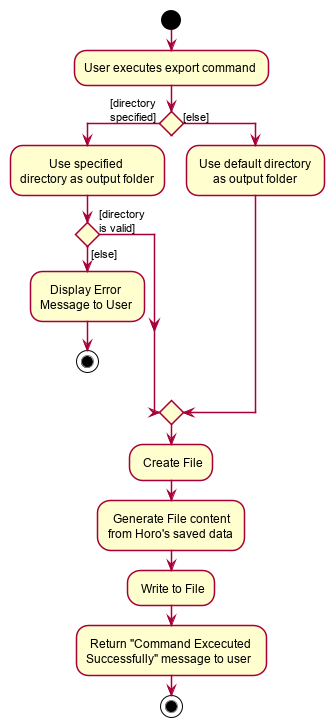
In order to generate the file content from Horo’s saved data, the file exporter uses the IcsConverter class to convert EventSource and TaskSource objects
stored in the ModelManager singleton object into their ICS String representations.
They will then be concatenated together using a StringBuilder object. Boilerplate information will be added
at the start and end of the save file to make the file valid to be imported to other Calendar applications.
Check out the iCalendar Wiki Page for more information on the specifications.
-
Can export Horo’s save data as a file The
ICSComponent,with a.icsextension. -
Can import other Horo’s save data from a
.icsfile.
4.4.1. Design Considerations
Aspect: Handling of Horo TaskSource and EventSource conversion to ICS Strings
-
Alternative 1 (Current Choice): Use of a separate class
IcsConverterto convertTaskSourceandEventSourceobjects their ICS string representations.-
Pros: Adherence to Single Responsibility Principle, decouples
IcsExporterfrom theTaskSourceandEventSourceclasses, and keeps code reusable and scalable. -
Cons: Not consistent with Object-Oriented Programming structure.
-
-
Alternative 2: Create a common
IcsConvertibleInterface forTaskSourceandEventSourceto implement atoIcsString()function.-
Pros: Adheres to Object-Oriented Programming structure.
-
Cons: Hard to reuse functions and modify code.
-
Alternative 1 was chosen eventually, as I felt that it is more important to adhere to the Single Responsibility Principle and keep all code relevant to converting objects to ICS Strings in the same class.
This further makes it easier for future debugging, and makes adding new exportable objects a lot easier as there are common functions that can be used.
4.5. UI Component
4.5.1. Implementation during change in Events and Tasks
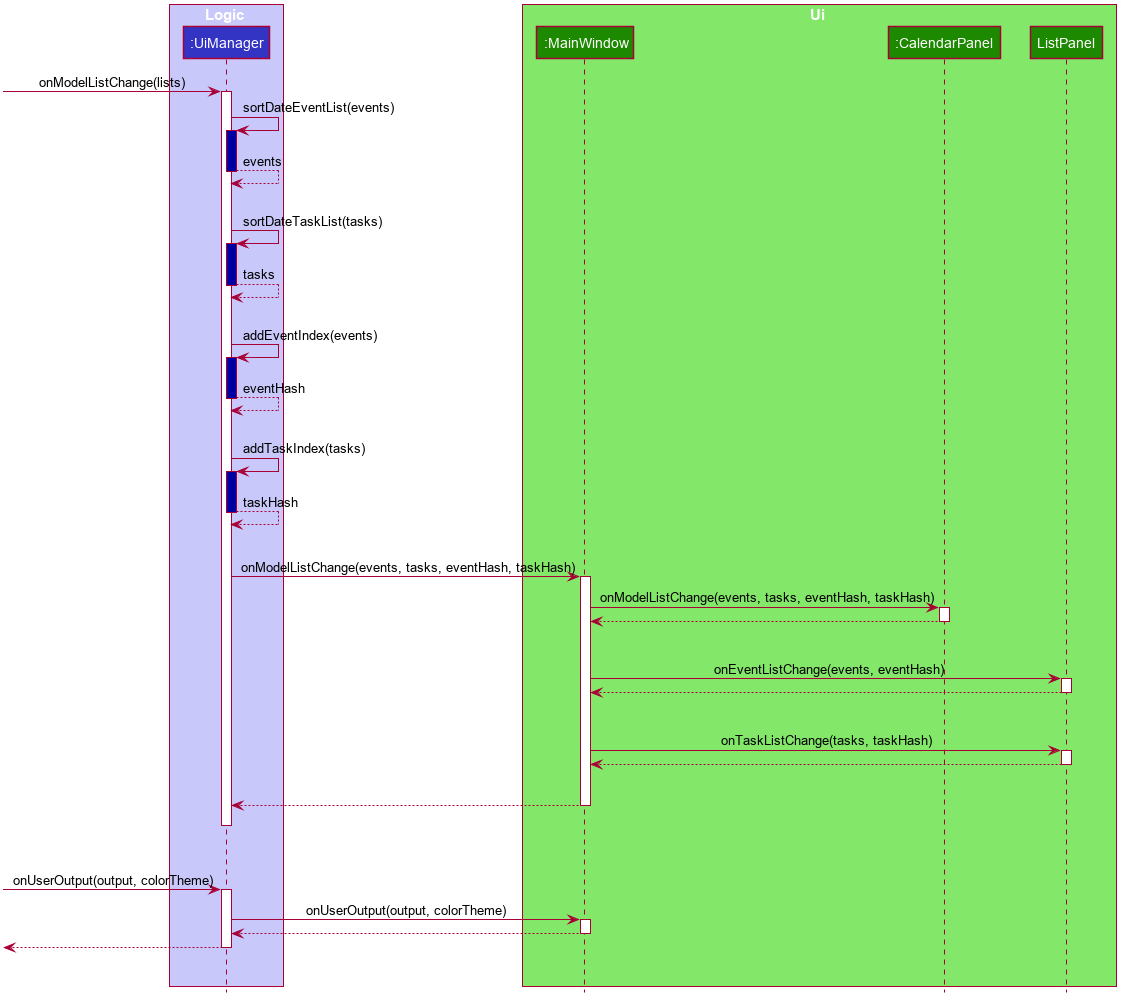
The UI system is managed by the UiManager, which is found in Logic component and is responsible for any change in the models and hence updating the necessary UI portions. The UiManager then holds a single instance of the MainWindow, which represents the base of the UI, and holds the different panels of the UI. Here is the sequence of a change in Events and Tasks for the UI.
Step 1. UiManager will be called using onModelListChange(lists) method. This will, in turn, take in the ModelLists, split them into the events and tasks, and sort them. Afterward, two HashMaps, eventHash and taskHash are created to deal with the indexing of the UI later on.
Step 2. MainWindow will be called by UiManager using onModelListChange(events, tasks, eventHash, taskHash), which will in turn proceed to call the methods that will update the different views represented by:
-
CalendarPanel-onModelListChange(events, tasks, eventHash, taskHash) -
ListPanel-onEventListChange(events, eventHash)andonTaskListChange(tasks, taskHash)
Step 3. UiManager will also be called using onUserOutput(output, colorTheme), which will in turn call onUserOutput(output, colorTheme) for MainWindow.
As for these 3 main panels, each of them will be explained further below
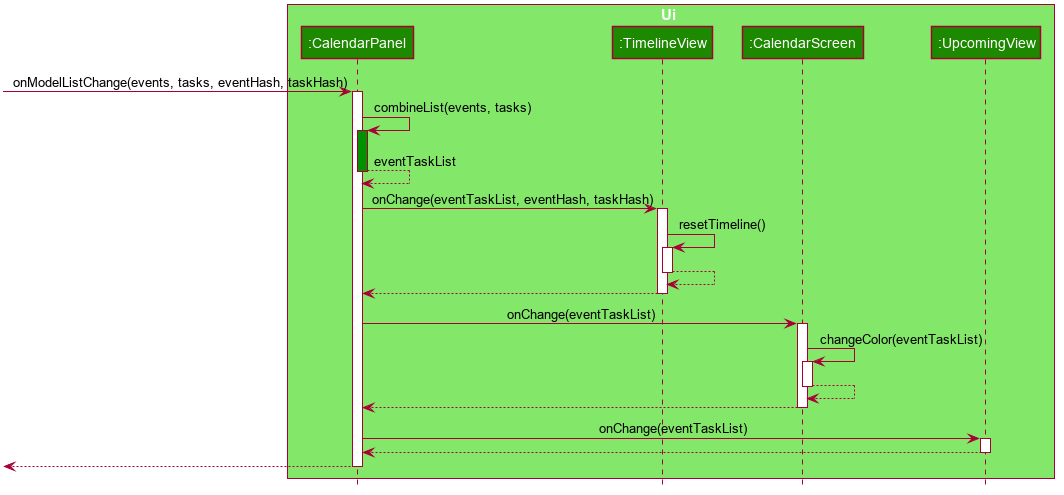
CalendarPanelStep 2.1. CalendarPanel will be called by onModelListChange(events, tasks, eventHash, taskHash), and will proceed to zip the two lists into a single list for sorting purposes.
Step 2.2. Afterward, it will call onChange for the 3 smaller components:
-
TimelineView- When called, it will reset the current timeline usingresetTimeline() -
CalendarScreen- When called, it will change the calendar to the given date, as well as callingchangeColor(eventTaskList)to change the color of a day in the calendar. -
UpcomingView- When called, it will simply reset the view to input the correct events and tasks.
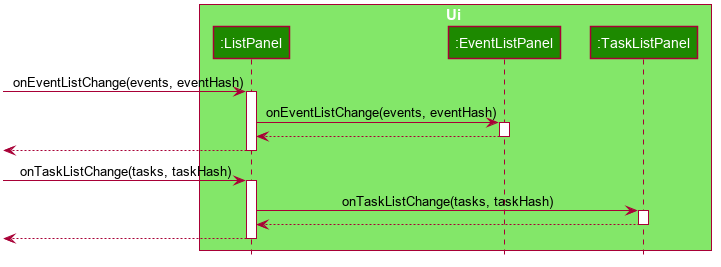
ListPanelStep 2.3. ListPanel will be called using onEventListChange(events, eventHash) first. It will proceed to call EventListPanel to change the list according to the given list of events.
Step 2.4. Additionally, ListPanel will also be called using onTaskListChange(tasks, taskHash), which will eventually call TaskListPanel to change the list accordingly as well.
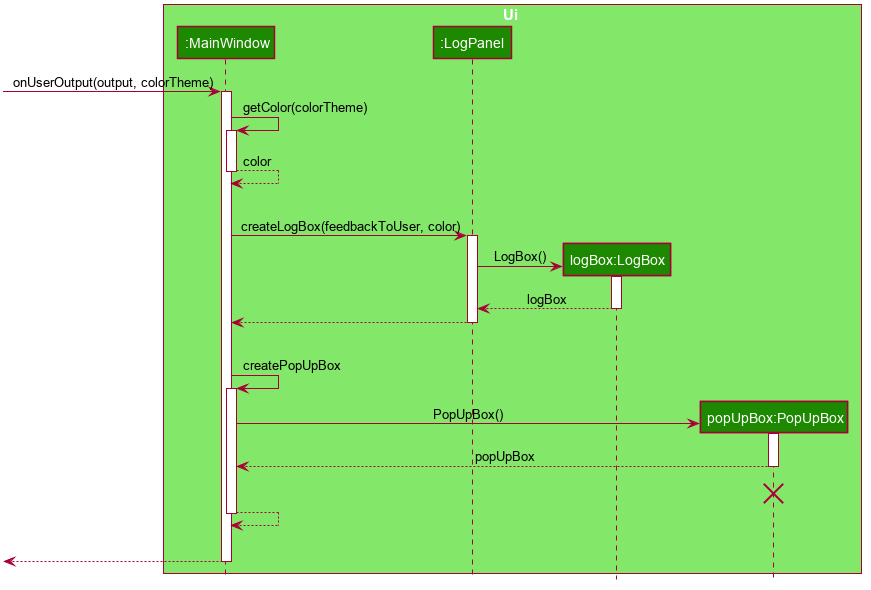
LogPanelStep 3.1. When MainWindow gets called using onUserOutput(output, colorTheme), it will proceed to get the actual color scheme in the form of a String, and creates 2 different boxes to display the output.
Step 3.2. It will call LogPanel to create a LogBox using createLogBox(feedbackToUser, color) to display the output to the user in LogPanel
Step 3.3. Next, it creates PopUpBox and display it temporarily on any of the panels, and proceed to unused afterward.
4.5.2. Implementation when changing the date of timeline
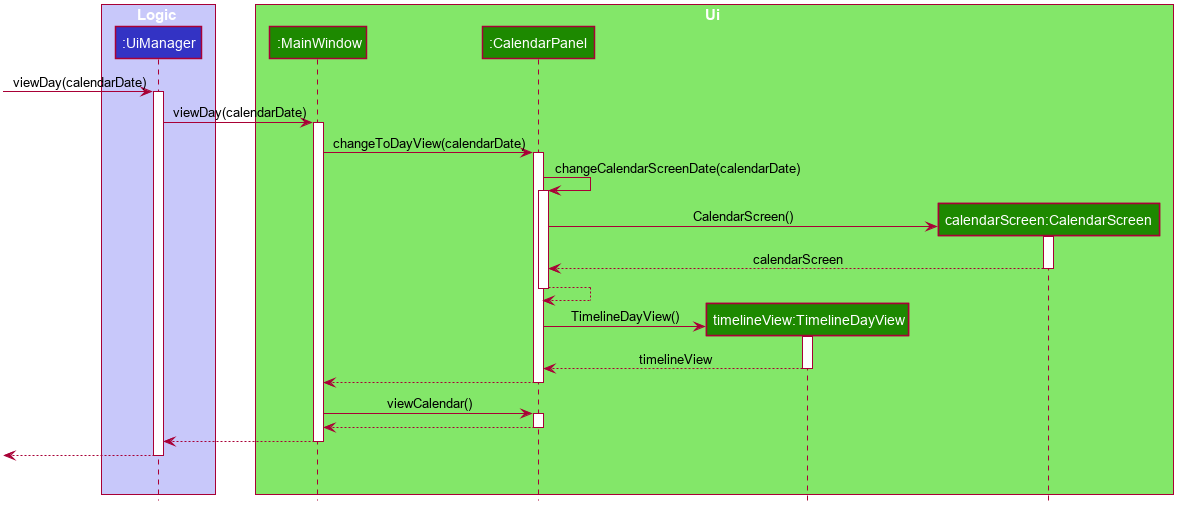
Here is an example of the sequence for the UI when DayViewCommand is executed to change the date of the timeline.
Step 1. When the command is executed, it will proceed to call UiManager through viewDay(calendarDate), which in turn will call MainWindow and subsequently CalendarPanel.
Step 2. CalendarPanel will proceed to execute changeCalendarScreenDate(calendarDate), which will create an instance of CalendarScreen to display the calendar.
Step 3. Afterward, a new instance of TimelineDayView will be created to display the timeline.
Step 4. Lastly, MainWindow will call viewCalendar which will be explained in the next section, allowing CalendarPanel to be visible while the other panels remain invisible.
4.5.3. Implementation when changing views
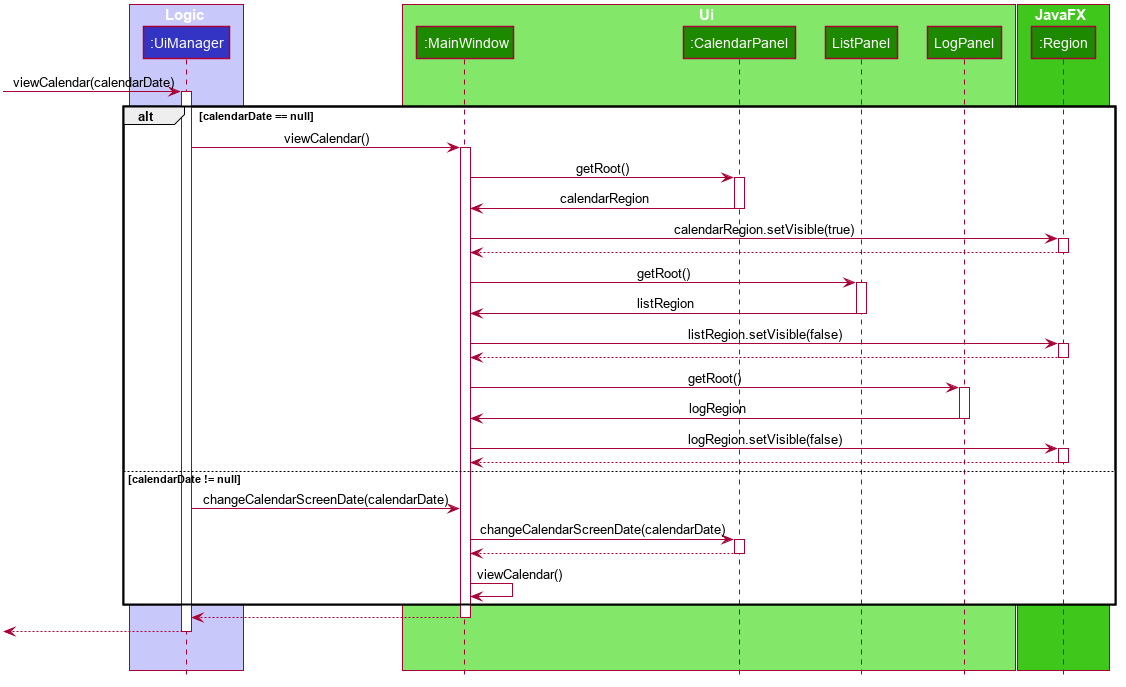
Here is an example of the sequence for the UI when CalendarViewCommand is executed.
Step 1. When the command is executed, it will proceed to call UiManager through viewCalendar(calendarDate), which will proceed to check if the giving date is null or a date. The validity check is previously check in the parser.
Step 2. If calendarDate is null, the UiManager will simply call MainWindow to switch the view with the method viewCalendar().
Step 3. MainWindow will obtain the Region of the 3 panels: CalendarPanel, ListPanel and LogPanel, and proceed to set only CalendarPanel to be visible.
Step 4. If calendarDate is not null, UiManager will then call MainWindow using changeCalendarScreenDate(calendarDate), to change the CalendarScreen to the given date.
Step 5. Afterward, it will proceed and continue with Step 3, which is simply calling viewCalendar() again.
Since the sequence for CalendarViewCommand is roughly similar to ListViewCommand and LogViewCommand, those 2 commands will not be explained.
4.5.4. Design Considerations
The design considerations are more towards how the appearance of the UI, as well as how the architecture of the code would have changed depending on such appearance.
Aspect: Design of the CalendarPanel
-
Alternative 1: The
CalendarPanelis of an actual calendar, depicting a limited number of events and tasks on each day of the month.-
Pros: It will provide a better representation of a calendar, allowing people to judge how much is going on in a day of that month in one look.
-
Cons: Due to the nature of how limited in size a calendar can be, the user will be required to either check
ListPanelfor the details of an event or task, or have an extra screen beside the calendar for the user to check the details. -
Cons: Similarly, a calendar can only input up to a fixed amount of events or tasks there are on a particular day.
-
-
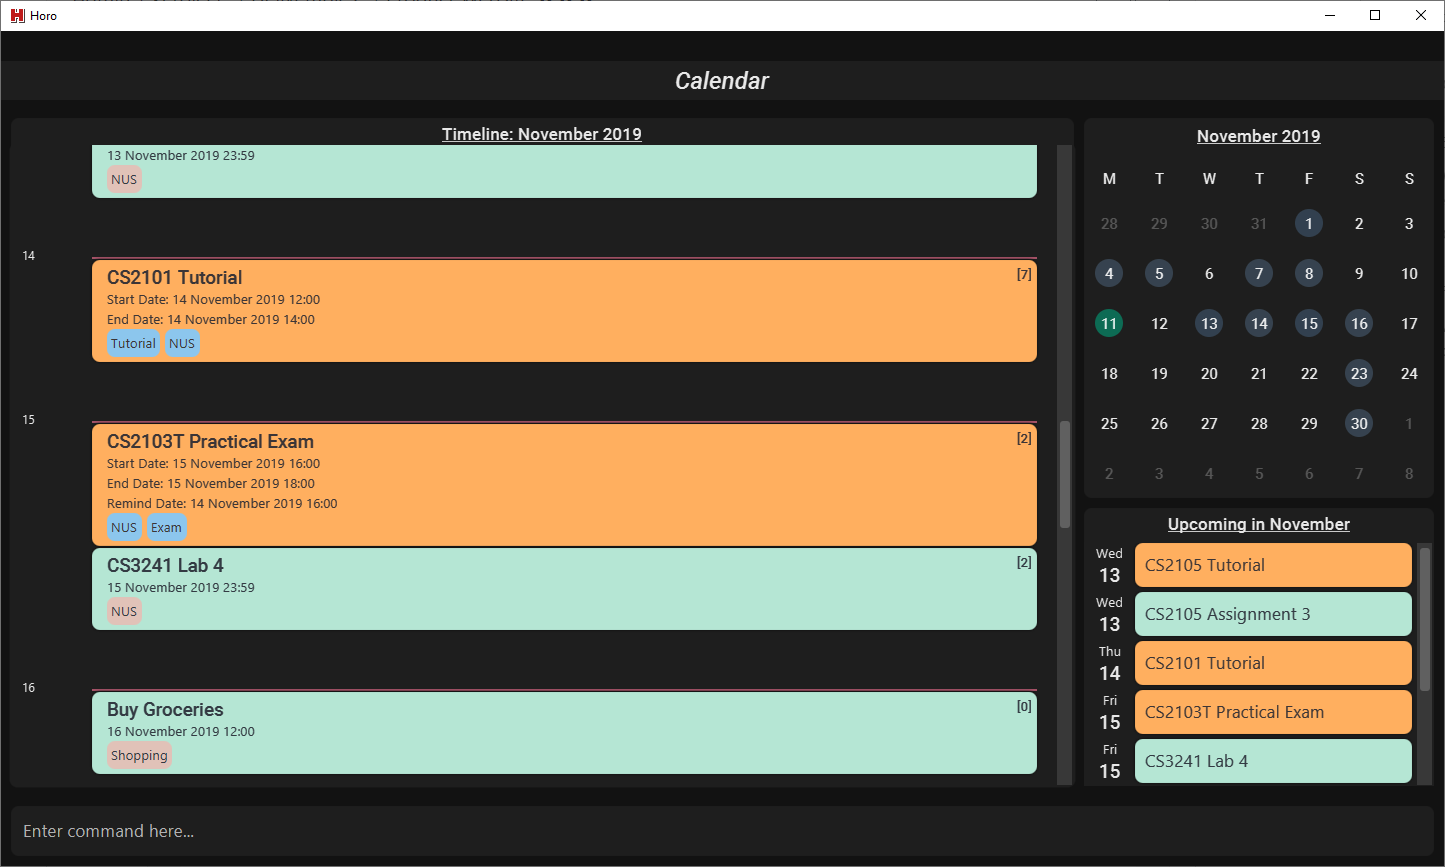
Alternative 2 (current choice): The
CalendarPanelconsists of a mini-calendar as well as a timeline. An additional slot for upcoming events and tasks was later designed with an increase in space.-
Pros: Provides a much greater space to show how much events or tasks one can have in a day, week or month.
-
Pros: The user can easily manage and check the Events and Tasks of a certain day.
-
Cons: Even though it is a timeline, it is still rather similar to list view, just with the timeline added to limit the number of events or tasks seen on that day, week or month.
-
Cons: The user will not be able to easily know what Events or Tasks there are, unless they change the view to Month view. On the other hand, the increase in space allows a small section for the upcoming events and tasks which tackles this problem.
-
Aspect: Design of the LogPanel
-
Alternative 1: The
LogPanelis placed side-by-side with any other panel.-
Pros: The users can always have a visualization of the success of their commands
-
Cons: A large portion of the space is used for the
LogPanel, even if it is scaled down compared to the other panels. -
Cons: Appearance-wise, it looks extremely clunky due to most of the users' time will be looking at the calendar or list itself instead of the log.
-
-
Alternative 2 (current choice): The
LogPanelis placed separately as a different panel that can be accessed at any time from other panels. After each command is typed, a pop-up box will appear to indicate the success or failure of the command.-
Pros: Most of the time, users would only want to know if their command is successful or not. Thus having the pop-up box will be sufficient for such an indication.
-
Cons: The user will have to check the
LogPanel
-
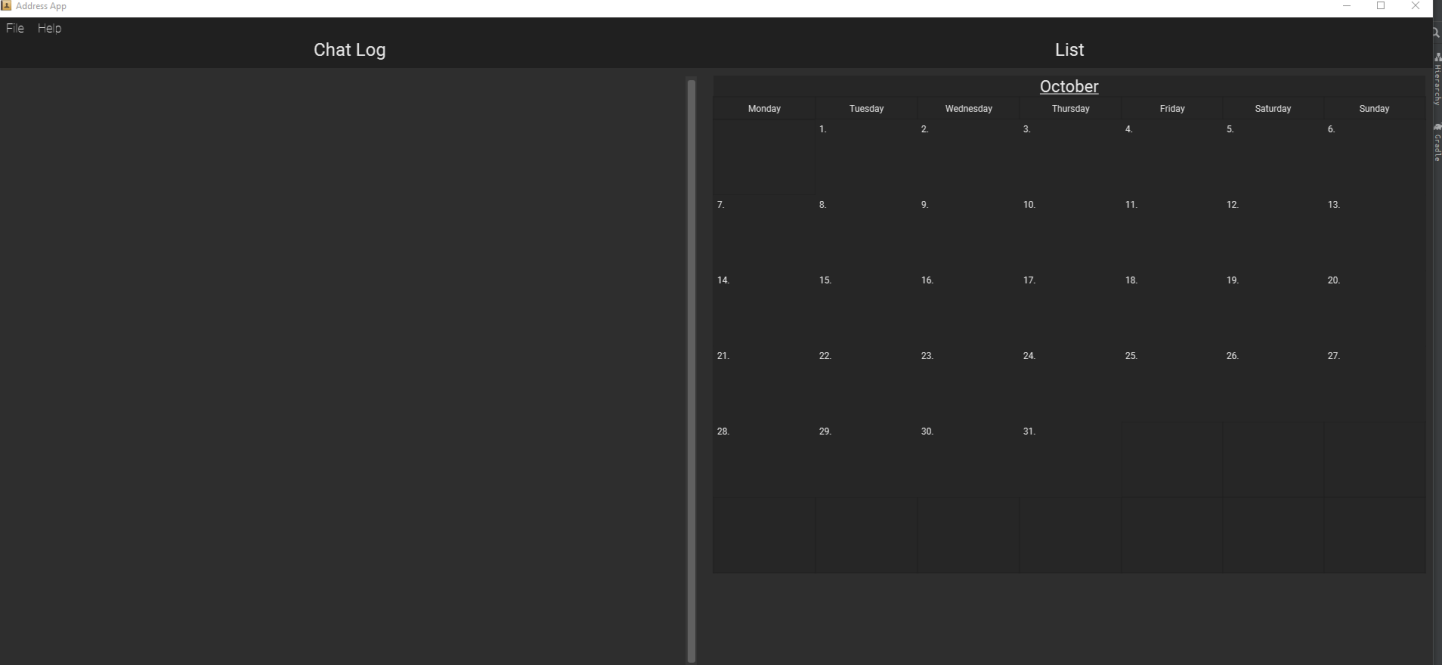
The initial design is as of the image above showing the old UI. However, we decided to scrape it and did an overhaul of the UI using alternative 2 instead. This is due to our decision of wanting a better-looking and minimalist UI instead of one packed with information.
5. Documentation
Refer to the guide here.
6. Testing
Refer to the guide here.
7. Dev Ops
Refer to the guide here.
Appendix A: Product Scope
Target user profile:
-
is a student
-
has a need to manage their Events and Tasks for visualization.
-
requires reminders for their Events and Tasks.
-
prefer desktop apps over other types
-
can type fast
-
prefers typing over mouse input
-
is reasonably comfortable using CLI apps
Value proposition: manage Reminders as well as viewing Events and Tasks much faster than a typical mouse/GUI driven app
Appendix B: User Stories
Priorities: High (must have) - * * *, Medium (nice to have) - * *, Low (unlikely to have) - *
| Priority | As a … | I want to … | So that I can… |
|---|---|---|---|
|
new user |
see usage instructions |
refer to instructions when I forget how to use the App |
|
user |
add an Event or Task |
keep track of an Event or Task that I have in the future |
|
user |
delete an Event or Task |
remove the Event or Task I no longer need. |
|
user |
find an Event or Task by name |
locate the details of the Event or Task without having to go through the entire list |
|
user |
find an Event or Task by tags |
remember the details of the Event or Task that I forget about |
|
user |
undo and redo commands |
undo any commands which wrongly inputted |
|
user |
edit my Events and Tasks |
change the details of the event, be it location, date or time |
|
user that works on multiple computer |
port my data between computers |
keep track on all my computers. |
|
student |
have constant reminders to track the deadline of my assignments |
not forget to complete and submit them |
|
student |
keep track of how long it takes for me to complete a task |
gauge how long I will need to take for future similar tasks |
|
student with weekly assignments and lectures |
have my reminders to be recurring |
be reminded without having to input the information in again |
|
busy student |
have a convenient way to visually see my assignments and projects |
complete them in the right priority |
|
busy user |
be informed if any different events clash with each other |
understand which event to prioritize or reschedule |
|
user |
add a contacts |
add them into Events to remind myself who I am meeting up with |
|
user |
archive my completed Tasks |
remind myself if I complete a task but forgot about it |
|
user |
create custom commands that contain the execution of multiple sub-commands |
quickly input in a command without the need to edit it |
|
student |
visualize my timetable |
plan for when it is time to take a break from studying |
|
student |
find a time for my project teammates to meet up |
schedule a meeting without clashing together with other events |
|
user |
import contacts in vCard format |
integrate them with my events |
|
user |
export contacts in vCard format |
integrate them with my other computers |
|
student |
keep track of sub-tasks in a main task |
know my current progress in a report |
{More to be added}
Appendix C: Use Cases
(For all use cases below, the System is the Horo and the Actor is the user, unless specified otherwise)
Use case 1: Add a Task
MSS
-
User requests to add a Task
-
Horo replies that the Task has been added
Use case ends.
Extensions
-
1a. The user adds additional sub-commands to the Task command
Use case ends.
-
2a. The given add Task command is of the wrong format.
-
2a1. Horo displays an error message.
Use case resumes at step 1.
-
Use case 2: Delete a Task
MSS
-
User requests to delete a specific Task from the already displayed list
-
Horo deletes the Task
Use case ends.
Extensions
-
2a. The given delete Task command is of the wrong format.
-
2a1. Horo displays an error message.
Use case resumes at step 1.
-
Use case 3: Find a Task by name
MSS
-
User requests to find a Task
-
Horo displays the list of Task with the keywords found in its name
Use case ends.
Extensions
-
2a. The given find Task command is of the wrong format.
-
2a1. Horo displays an error message.
Use case resumes at step 1.
-
Use case 4: Undo and Redo commands
MSS
-
User requests to add an Task
-
Horo replies that the Task has been added
-
User requests to undo the command
-
Horo replies that the previous command has been undone
Use case ends.
Extensions
-
1a. The user adds additional sub-commands to the Task command
Use case ends.
-
2a. The given add Task command is of the wrong format.
-
2a1. Horo displays an error message. Use case resumes at step 1
-
-
4a. User decides the to Redo the added Task
-
3a1. Horo replies that the added Task has been redone
Use case ends
-
Use case 5: Edit a Task
MSS
-
User requests to add a Task
-
Horo replies that the Task has been added
-
User request to edit a Task with the sub-commands
-
Horo replies that the Task has been edited
Use case ends.
Extensions
-
1a. The user adds additional sub-commands to the Task command
Use case ends.
-
2a. The given add Task command is of the wrong format.
-
2a1. Horo displays an error message.
Use case resumes at step 1.
-
-
4a. The given edit Task command is of the wrong format.
-
4a1. Horo displays an error message.
Use case resumes at step 3.
{More to be added}
-
Use case 6: Export Command
MSS
-
User requests to export Horo data.
-
Horo creates a file in the same directory as Horo.
-
Horo replies that its data has been successfully exported.
Use Case Ends.
Extensions
-
2a. The user specifies which directory to export the save data to.
Use Case resumes at step 3.
Use case 7: Import Command
MSS
-
User requests to import Horo data from a specific file.
-
The file is imported into Horo.
-
Horo replies that the data has successfully been imported into Horo.
Use Case Ends.
Extensions
-
1a. The file does not exist or is corrupted.
-
1a1. Horo replies with an error message.
Use Case Ends.
-
Appendix D: Non Functional Requirements
-
Should work on any mainstream OS as long as it has Java
11or above installed. -
Should be able to hold up to 1000 Events and Tasks without a noticeable sluggishness in performance for typical usage.
-
Should function on both
32-bit environmentand64-bit environment -
Should work without any internet required.
-
A user with above average typing speed for regular English text (i.e. not code, not system admin commands) should be able to accomplish most of the tasks faster using commands than using the mouse.
{More to be added}
Appendix F: Product Survey
reminder-bot on Discord
Author: JellyWX
Pros:
-
A reminder bot on a popular voice and text chat application
-
Capable of parsing english language as compared to CLI styled commands
Cons:
-
Lack of visualization of the Events and Tasks
-
Parsing english language makes it slower to type with a longer requirement as compared to CLI styled commands
Google Calendar
Company: Google
Pros:
-
A Calendar application that is capable of storing Events and Tasks as well.
-
Mostly uses GUI for interaction with user instead of having CLI, favouring to the common crowd.
Cons:
-
Mostly uses GUI for interaction with user instead of having CLI, which does not favour those who prefers CLI.
-
It requires an account to be usable.
-
The desktop version requires a browser, which in turn requires Internet and hence not offline.
Appendix G: Instructions for Manual Testing
Given below are instructions to test the app manually.
| These instructions only provide a starting point for testers to work on; testers are expected to do more exploratory testing. |
G.1. Launch and Shutdown
-
Initial launch
-
Download the jar file and copy into an empty folder
-
Double-click the jar file
Expected: Shows the GUI with the calendar at today’s date, with no events or tasks.
-
G.2. Adding, Deleting and Editing Events
-
Adding
-
Start Horo with no save data.
-
Enter
listinto the command box. -
Enter
add_event "My Event Description" "11/11/2019 12:00"into the command box. -
Expected: An event will be created with the title "My Event Description", with start date "11/11/2019 12:00".
-
-
Editing
-
Enter
edit_event 0 --description "New Event Description"into the command box. -
Expected: Your event "My Event Description" will be renamed to "New Event Description".
-
-
Deleting
-
Enter
delete_event 0into the command box. -
Expected: Your event "New Event Description" will be deleted, leaving an empty list view.
-
G.3. Import and Export
-
Export
-
Start Horo with no save data.
-
Enter the
exportcommand.
Expected: A save file with the nameHoro_export_<timestamp>.icswill be created in the same directory as Horo’s jar file. -
Enter the command
export --directory <DIRECTORY>, where <DIRECTORY> is the directory where the save file will be created.
Expected: The save file will be created in the specified directory.
-
-
Import from iCalendar file.
-
Create some events and tasks in Horo.
-
Take note of the current events and tasks by entering the
listcommand, going into the list view. -
Enter the
exportcommand. -
Delete the save data from Horo and re-launch the app.
-
Import the save data using the import command
import <FILEPATH>.
Expected: The imported events and tasks should be the same as when they were exported.
-
G.4. Notification System
-
Posting notifications to the desktop
-
Prerequisites: Make sure notifications have been switched on by using the
notif_oncommand.
Make sure the System Tray is supported. -
Test case:
add_event "Test Event" "[CURRENT DATE] [CURRENT TIME INCREMENTED BY ONE MINUTE]"
Expected: Upon the next minute, a notification should be posted to your desktop through the system tray. -
Test case:
add_task "Test Task" --due "[CURRENT DATE] [CURRENT TIME INCREMENTED BY ONE MINUTE]"Expected: Upon the next minute, a notification should be posted to your desktop through the system tray.
-
G.5. Ui System
-
Change between different UI views
-
Prerequisites: Make sure you are on a different view panel than the one you are going to execute.
-
Test case:
list
Expected: Changes to the list view panel. -
Test case:
log
Expected: Changes to the log view panel. -
Test case:
calendar
Expected: Changes to the calendar view panel.
-
-
Change date of the calendar without changing the timeline.
-
Test case:
calendar --date "10/2019"
Expected: Calendar date will change accordingly -
If you are not in the calendar view panel, it should change the current view to the calendar view.
-
-
Change date of the timeline in calendar view
-
Test case:
week dd/MM/yyyy
Expected: Changes the timeline to the week view containing that day in the given week. -
Test case:
month MM/yyyy
Expected: Changes the timeline to the month view of the specified month and year. -
Test case:
day dd/MM/yyyy
Expected: Changes the timeline to the day view of the specified day, month and year. -
For all the test cases, if you are not in calendar view panel, it should change the current view to the calendar view.
-
G.6. Undoing and Redoing Commands
-
Undoing an
add_eventoradd_taskcommand-
Firstly, switch to the List-view of Horo
-
listview
-
-
Input the following command to add an event:
-
add_event "Test Event" "[CURRENT DATE] [CURRENT TIME]
-
-
To add a task, input the following command:
-
add_task "Test Task"
-
-
Expected: The added event or task is now visible in the List-view of Horo
-
Now, run the undo command
-
undo
-
-
Expected: The added event or task is no longer visible in the List-view of Horo
-
-
Redoing an
add_eventoradd_taskcommand-
Continuing from the above undo command, now run the redo command
-
redo
-
-
Expected: the formerly added event or task reappears in the List-view of Horo
-
-
Undoing
delete_eventordelete_taskcommand-
Firstly, switch to the List-view of Horo
-
listview
-
-
Input the following command to add an event: (Since our delete command allows multiple deletion, try adding more than one)
-
add_event "Test Event" "[CURRENT DATE] [CURRENT TIME]
-
-
To add a task, input the following command:
-
add_task "Test Task"
-
-
Expected: The added event or task is now visible in the List-view of Horo
-
Now, delete the event or task that you have added (you can delete multiple by specifying multiple indexes delimited by spaces)
-
delete_event [INDEX/ES OF EVENT IN LIST VIEW] -
delete_task [INDEX/ES OF TASK IN LIST VIEW] -
Example:
delete_event 0 1 2(deletes the events with index 0, 1 and 2)
-
-
Expected: The added events or tasks are no longer visible in the List-view of Horo
-
Run the undo command
-
undo
-
-
Expected: The deleted events and tasks are again visible in the List-view of Horo
-
-
Redoing a
delete_eventordelete_taskcommand-
Continuing from the above undo command, now run the redo command
-
redo
-
-
Expected: the formerly added events or tasks are once again removed from the List-view of Horo
-
-
Undoing
edit_eventoredit_taskcommand-
Firstly, switch to the List-view of Horo
-
listview
-
-
Input the following command to add an event:
-
add_event "Test Event" "[CURRENT DATE] [CURRENT TIME]
-
-
To add a task, input the following command:
-
add_task "Test Task"
-
-
Expected: The added event or task is now visible in the List-view of Horo
-
Now, edit the event or task that you have added (the description, due date and tags are optional)
-
edit_event [INDEX OF EVENT IN LIST VIEW] [NEW DESCRIPTION] [NEW DUE DATE] [NEW TAG] -
Example:
edit_task 1 --description "Buy Rori a present" --due "17/08/2019 12:00" --tag Present
-
-
Expected: Any of the specified new description, due date or tag of the event or task will replace the old information in the List-view
-
Run the undo command
-
undo
-
-
Expected: The task or event will contain its old data before the edit was being made
-
-
Redoing a
edit_eventoredit_taskcommand-
Continuing from the above undo command, now run the redo command
-
redo
-
-
Expected: the event or task has been updated again to the new information that was initially specified in the edit command
-